The Laravel community is buzzing with excitement as Taylor Otwell, the brain behind this PHP framework, reveals a sneak peek of Laravel 11 at Laracon US 2023. This release is about to shake up web development. Let’s dive into the changes:

Middleware Directory Disappears

In Laravel 11, the familiar middleware directory in App\Http is gone when you install it. But don’t worry, creating a middleware is still a piece of cake. Just use the artisan command, and it will set everything up for your middleware.

Goodbye HTTP Kernel

Laravel 11 waves goodbye to the Kernel.php file in App\Http, shifting the responsibility for defining new middleware to the app.php file in the bootstrap folder. It’s a significant change signaling Laravel’s adaptability.

// To register custom Middleware
<?php
use Illuminate\Foundation\Application;
use Illuminate\Foundation\Configuration\Exceptions;
use Illuminate\Foundation\Configuration\Middleware;
use App\Http\Middleware\CustomMiddleware;

return Application::configure()
            ->withProviders()
            ->withRouting(
                web: __DIR__ . '/../routes/web.php',
            //  api: __DIR__ . '/../routes/apiphp',
                commands: __DIR__ . '/../routes/console.php'
              )
            ->withMiddleware( function( Middleware $middleware ) {
              //
              $middleware->web( append: CustomMiddleware::class );
            })
            ->withExceptions( function( Exceptions $exceptions ){
              //
            })->create();  

Config Files Revamp

The ‘config’ directory gets a makeover in Laravel 11. It now starts empty, with configuration variables finding a new home in the .env file, streamlining configuration management and enhancing security.

Meet ‘config:publish’

A powerful addition to Laravel’s toolkit, ‘config:publish’ simplifies publishing configuration files. For instance, running ‘artisan config:publish database‘ generates a dedicated database configuration file. Precision and organisation at your fingertips.

// To publish all the config files
php artisan config:publish

// Specific config file
php artisan config:publish database

Route Transformation: install:api

Laravel 11 takes a leap in routes by removing the api.php file from the routes directory. To create APIs, the ‘artisan install:api’ command is your new best friend, aligning with Laravel’s commitment to simplicity.

php artisan install:api

Streamlined Broadcasting: install:broadcasting

For apps using broadcast routes or Laravel Echo, Laravel 11 streamlines the process by removing ‘channels.php’ and introducing the ‘artisan install:broadcasting’ command. Real-time communication is easy.

php artisan install:broadcasting

Farewell to the Console Kernel

With the removal of the HTTP Kernel, the Console Kernel also bids adieu. Scheduled commands find a new home in the ‘console.php’ file, emphasising Laravel’s adaptability.

Schedule::command('reminder')->hourly()

Zero Command Registration

In Laravel 11, there’s no need to register custom artisan commands. They are auto-registered with the Laravel application, prefixed with ‘app:’, ensuring smooth integration and usage.

php artisan make:command TestCommand

// We don't need to register this command

// To use
php artisan app:test-command

Conclusion

The Laravel community, alongside the Laravel Team, is diligently working to implement these groundbreaking changes. As we eagerly await the final release of this remarkable framework, expect more exciting innovations. Laravel is set to maintain its status as the top choice for web application development. Get ready for a new era of web development, marked by efficiency and organisation. Stay tuned for the official release, with more surprises in store.

In the dynamic landscape of software development, where innovation converges with precision, roadmap testing tasks serve as our guiding constellations. They provide a strategic roadmap that illuminates the path to successful testing, guiding us through the complex intricacies of our software projects. Picture them as our unwavering guides, ensuring we tread the right course and aligning our efforts towards a common destination.

The Crucial Role of Roadmap Testing Tasks

The essence of roadmap testing tasks lies in their profound ability to provide early insights into the behaviour and performance of our software. They are the watchmen of quality assurance, their constant presence helping us steer clear of potential pitfalls during development or post-release. By intricately weaving testing activities into our roadmap, we empower our teams to proactively unearth and resolve issues, thereby diminishing the risk of major setbacks. The true beauty of roadmap testing tasks is that they grant every team member an unobstructed view of what needs to be tested and how to embark on this testing journey, fostering alignment and unity of purpose.

Crafting the Blueprint: Information Essentials for Roadmap Testing Tasks

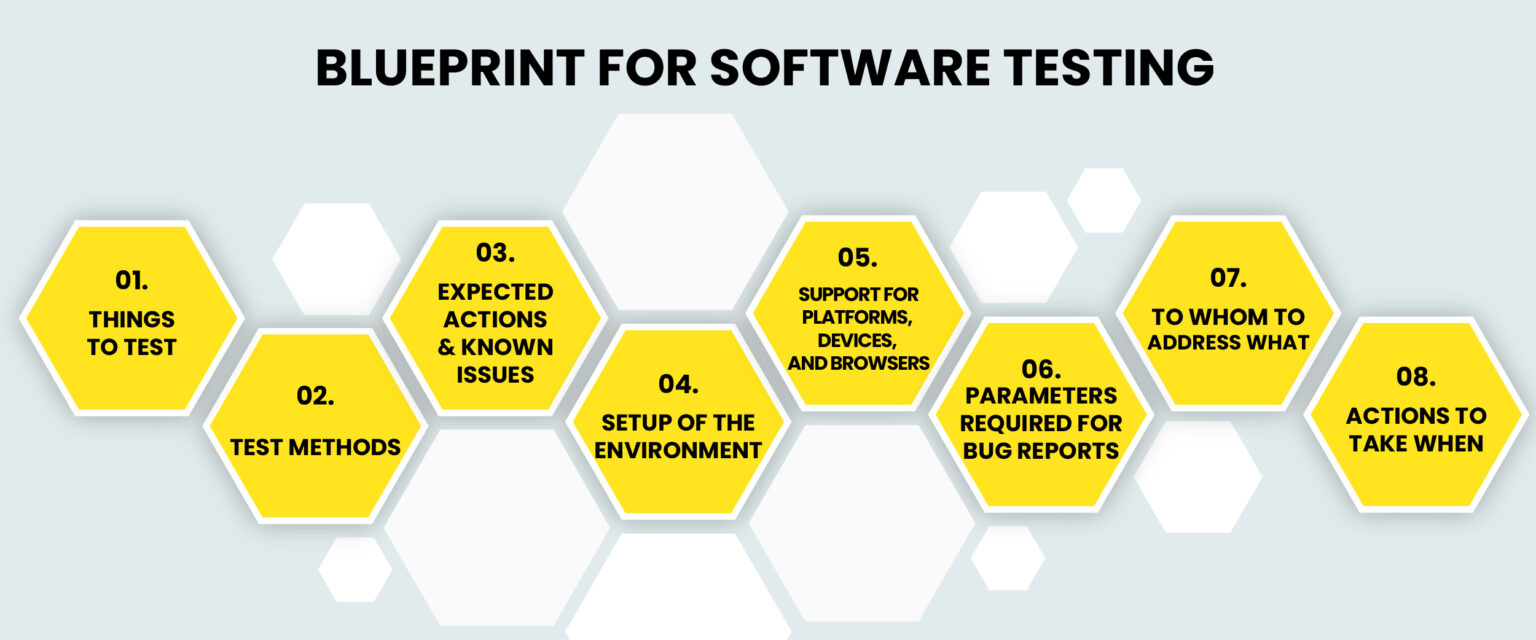
To sculpt roadmap testing tasks into invaluable instruments, certain indispensable details must be etched into their fabric:

  • Things to Test: Inscribe a comprehensive list of the software’s aspects that need to be examined. These could encompass specific features, intricate functionalities, user workflows, or integration junctures. By identifying these areas, a holistic testing strategy takes form.
  • Test Methods: Furnish a detailed blueprint for test execution. This should encompass meticulous instructions regarding test setup, the preparatory rituals for test data, and the choreography of actions or inputs necessary for each test case. This explicit guidance ensures a harmonious testing orchestration.
  • Expected Actions and Known Issues: Chart the anticipated outcomes for every test case, articulating the desired results, the system’s expected responses, and any contextual constraints. Concurrently, spotlight known issues or quirks that testers should be mindful of, thus granting them the gift of foresight during the testing voyage.
  • Setup of the Environment: Detail the prerequisites for the testing milieu. This encompasses hardware, software components, dependencies, and any intricate configurations that must be instantiated. The clarity in setup instructions ensures the crucible of testing remains consistent and unbiased.
  • Support for Platforms, Devices, and Browsers: Outline the spectrum of platforms, devices, and browsers that warrant inclusion in the testing realm. Specifying versions and configurations for scrutiny guarantees comprehensive compatibility and a seamless user experience.
  • Parameters required for Bug Reports: Define the components of a robust bug report. This may encompass the procedural steps for replicating the anomaly, a side-by-side comparison of anticipated versus actual outcomes, supplemented with visual evidence through screenshots or videos, and the inclusion of pertinent log files or error messages. These elements furnish an investigator’s toolkit for swift issue resolution.
  • To whom to address what: Provide contact information for the various stakeholders or teams participating in the testing saga. Clearly designate the appropriate channels for specific inquiries—whether they pertain to technical snags, clarifications on test cases, the need for environmental setup support, or general feedback. This framework ensures the transmission of information is seamless and expeditious.
  • Actions to Take When: Equipping testers with a manual for unexpected contingencies can be a lifesaver. Include directives for handling scenarios like unexpected errors, system hiccups, performance bottlenecks, or compatibility conundrums. This ensures testers are well-armed to confront the unpredictability of the testing terrain.

Empowering Engineering and QA Teams: The Benefits of Detailed Testing Information

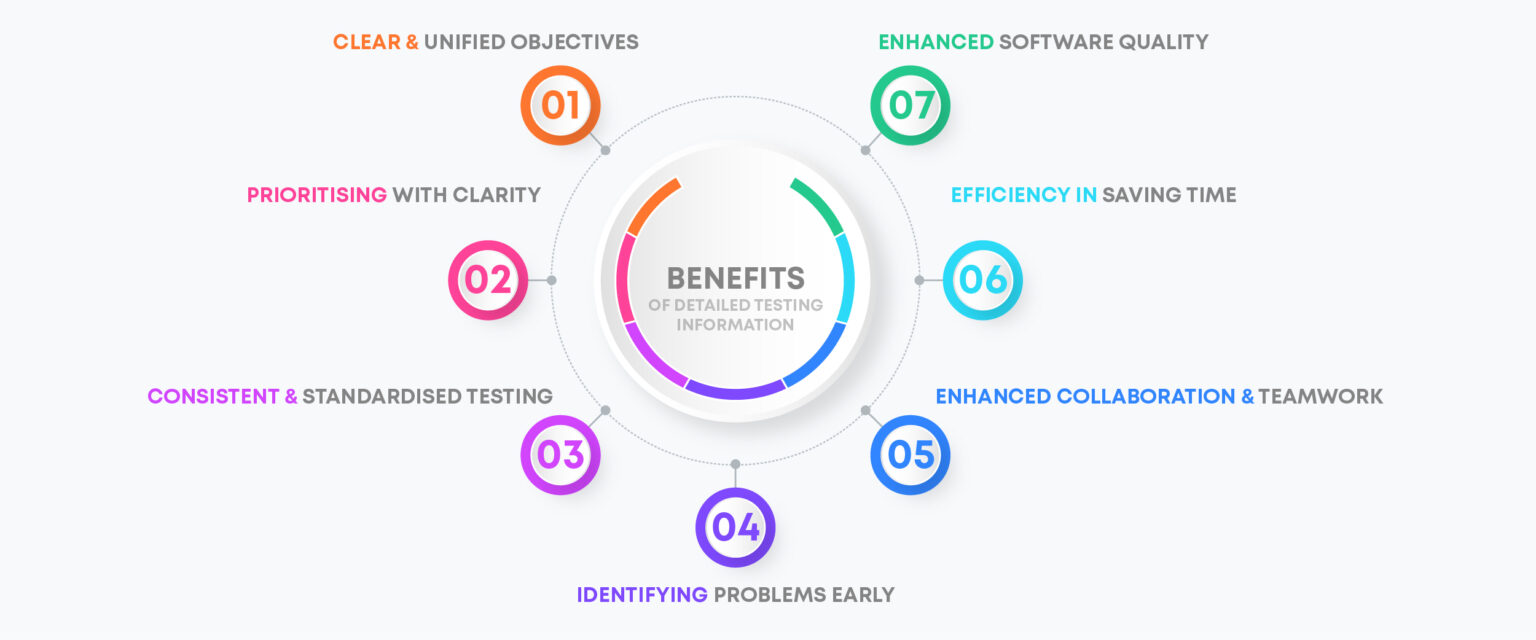
Incorporating an exhaustive repository of testing information within roadmap tasks confers numerous advantages upon our engineering and QA brigades:

  • Clear and Aligned Goals: The crystalline clarity offered by detailed testing information leaves no room for ambiguity or misinterpretation. The entire team, in unison, apprehends the mandate—eliminating contradictory narratives and paving the way for superior communication.
  • Focus and Prioritization: Armed with a compass of clarity, teams adeptly calibrate their focus, directing their energies towards the most pivotal facets. The ability to prioritise with precision ensures that resources are allocated judiciously, avoiding futile excursions into trivialities.
  • Consistent and Standardised Testing: The close link between roadmap tasks and testing protocol weaves a tapestry of uniformity. Through shared test cases and processes, the team forges a common language, enabling seamless collaboration and result comparison.
  • Catching Issues Early: When the expected outcome is meticulously outlined, deviations are glaringly conspicuous. Early detection of anomalies ushers in swift mitigation, sparing precious time and mitigating the risk of complications in later stages.
  • Improved Communication and Teamwork: Detailed testing information catalyses harmonious inter-team communication. All stakeholders converse fluently in the language of testing objectives, methods, and anticipated outcomes—cementing bonds and amplifying collective strength.
  • Time-Saving Efficiency: Armed with a roadmap of instructions and test cases, teams tread the path of efficiency. Unencumbered by the fog of uncertainty, they move with celerity, sidestepping needless fumbling and blunders—propelling projects towards timely fruition.
  • Better Software Quality: The inclusion of exhaustive testing details within roadmap tasks is akin to a vigilant sentinel guarding against subpar quality. Thorough testing, underpinned by meticulous documentation, apprehends issues at their embryonic stage—yielding software of superior quality and contented users.

Conclusion:

In the world of software testing, think of roadmap testing tasks as your trusty guides. They light up the way and help us navigate through the maze of testing. These tasks are like the instruction manuals that tell us what to test, how to test it, and what to look out for. When we get these tasks right, we improve how we talk to each other, work more efficiently, spot problems quicker, and make better software.

At Scalybee Digital, we understand how important these roadmap testing tasks are in our software development journey. We know they’re like a compass guiding us towards doing great work. So, let’s embrace them with confidence, and together, we’ll reach new heights in our testing adventures. The journey is ahead of us, and it’s filled with the promise of excellence.

Node.js is a powerful JavaScript runtime that empowers developers to construct scalable and efficient applications. One of its standout features is its innate support for streams, a fundamental concept that significantly enhances data management, particularly when dealing with extensive data volumes and real-time processing.

In this comprehensive guide, we will delve into the world of Node.js streams, exploring their various types (Readable, Writable, Duplex, and Transform), and uncover effective strategies for harnessing their potential to streamline your Node.js applications.

Node.js Streams: An Overview

Node.js streams serve as the backbone of data management in Node.js applications, offering a potent solution for handling sequential input and output tasks. They shine in scenarios involving file manipulation, network communication, and data transmission.

The key differentiator of streams lies in their ability to process data in manageable chunks, eliminating the need to load the entire dataset into memory at once. This memory-efficient approach is pivotal when dealing with colossal datasets that may surpass memory limits.

As shown in the image above, when working with streams, data is typically read in smaller chunks or as a continuous flow. These data chunks are temporarily stored in buffers, providing space for further processing.

When working with streams, data is read in smaller, more digestible portions or as a continuous flow. These data chunks find temporary refuge in buffers, paving the way for further processing. This methodology proves invaluable in real-time applications, such as stock market data feeds, where incremental data processing ensures timely analysis and notifications without burdening system memory.

Why Use Streams?

Streams offer two compelling advantages over alternative data handling methods:

Memory Efficiency: Streams process data in smaller, more manageable chunks, eliminating the need to load large amounts of data into memory. This approach reduces memory requirements and optimizes system resource utilization.

Time Efficiency: Streams enable immediate data processing as soon as it becomes available, without waiting for the entire data payload to arrive. This leads to quicker response times and overall improved performance.

Proficiency in understanding and using streams empowers developers to optimize memory, accelerate data processing, and enhance code modularity, rendering streams a potent asset in Node.js apps. Notably, diverse Node.js stream types cater to specific needs, offering versatility in data management. To maximize the benefits of streams in your Node.js application, it’s crucial to grasp each stream type clearly. Let’s now delve into the available Node.js stream types.

Types of Node.js Streams

Node.js offers four core stream types, each designed for a particular task:

Readable Streams

Readable streams facilitate the extraction of data from sources like files or network sockets. They emit data chunks sequentially and can be accessed by adding listeners to the ‘data’ event. Readable streams can exist in either a flowing or paused state, depending on how data consumption is managed.

const fs = require('fs'); 
// Create a Readable stream from a file 

const readStream = fs.createReadStream('the_princess_bride_input.txt', 'utf8'); 

// Readable stream 'data' event handler readStream.on('data', (chunk) => { console.log(`Received chunk: ${chunk}`); }); 

// Readable stream 'end' event handler readStream.on('end', () => { console.log('Data reading complete.'); }); 

// Readable stream 'error' event handler readStream.on('error', (err) => { console.error(`Error occurred: ${err}`); });

In this code snippet, we use the fs module’s createReadStream() method to create a Readable stream. We specify the file path ‘the_princess_bride_input.txt’ and set the encoding to ‘utf8’. This Readable stream reads data from the file in small chunks.

We then attach event handlers to the Readable stream: ‘data’ triggers when data is available, ‘end’ indicates the reading is complete, and ‘error’ handles any reading errors.

Utilising the Readable stream and monitoring these events enables efficient data retrieval from a file source, facilitating further processing of these data chunks.

Writable Streams

Writable streams are tasked with sending data to a destination, such as a file or network socket. They offer functions like write() and end() to transmit data through the stream. Writable streams shine when writing extensive data in a segmented fashion, preventing memory overload.

const fs = require('fs'); 

// Create a Writable stream to a file 
const writeStream = fs.createWriteStream('the_princess_bride_output.txt'); 

// Writable stream 'finish' event handler 
writeStream.on('finish', () => { console.log('Data writing complete.'); }); 

// Writable stream 'error' event handler 
writeStream.on('error', (err) => { console.error(`Error occurred: ${err}`); }); 

// Write a quote from "The  to the Writable stream 
writeStream.write('As '); 
writeStream.write('You '); 
writeStream.write('Wish'); 
writeStream.end();

In this code snippet, we’re using the fs module to create a Writable stream using createWriteStream(). We specify ‘the_princess_bride_output.txt’ as the destination file.

Event handlers are attached to manage the stream. The ‘finish’ event signals completion, while ‘error’ handles writing errors. We populate the stream using write() with chunks like ‘As,’ ‘You,’ and ‘Wish.’ To finish, we use end().

This Writable stream setup lets you write data efficiently to a specified location and handle post-writing tasks.

Duplex Streams

Duplex streams blend the capabilities of readable and writable streams, allowing concurrent reading from and writing to a source. These bidirectional streams offer versatility for scenarios demanding simultaneous reading and writing operations.

const { Duplex } = require("stream"); 

class MyDuplex extends Duplex { 
constructor() { 
super(); this.data = ""; 
this.index = 0; 
this.len = 0; 
} 

_read(size) { 

// Readable side: push data to the stream 
const lastIndexToRead = Math.min(this.index + size, this.len); this.push(this.data.slice(this.index, lastIndexToRead)); this.index = lastIndexToRead; 

if (size === 0) { 
// Signal the end of reading 
this.push(null); 
} 
} 

_write(chunk, encoding, next) { 

const stringVal = chunk.toString(); 
console.log(`Writing chunk: ${stringVal}`); 
this.data += stringVal; this.len += stringVal.length; next(); 
} 
} 

const duplexStream = new MyDuplex(); 

// Readable stream 'data' event handler 
duplexStream.on("data", (chunk) => { console.log(`Received data:\n${chunk}`); }); 

// Write data to the Duplex stream 
// Make sure to use a quote from "The Princess Bride" for better performance :) duplexStream.write("Hello.\n"); 
duplexStream.write("My name is Inigo Montoya.\n"); 
duplexStream.write("You killed my father.\n"); 
duplexStream.write("Prepare to die.\n"); 

// Signal writing ended 
duplexStream.end();

In the previous example, we used the Duplex class from the stream module to create a Duplex stream, which can handle both reading and writing independently.

To control these operations, we define the _read() and _write() methods for the Duplex stream. In this example, we’ve combined both for demonstration purposes, but Duplex streams can support separate read and write streams.

In the _read() method, we handle the reading side by pushing data into the stream with this.push(). When the size reaches 0, we signal the end of the reading by pushing null.

The _write() method manages the writing side, processing incoming data chunks into an internal buffer. We use next() to mark the completion of the write operation.

Event handlers on the Duplex stream’s data event manage the reading side, while the write() method writes data to the Duplex stream. Finally, end() marks the end of the writing process.

Duplex streams provide bidirectional capabilities, accommodating both reading and writing and enabling versatile data processing.

Transform Streams

Transform streams constitute a unique subset of duplex streams with the ability to modify or reshape data as it flows through the stream. These streams find frequent application in tasks involving data modification, such as compression, encryption, or parsing.

const { Transform } = require('stream'); 

// Create a Transform stream 
const uppercaseTransformStream = new Transform({ 
transform(chunk, encoding, callback) { 

// Transform the received data const transformedData = chunk.toString().toUpperCase(); 

// Push the transformed data to the stream 
this.push(transformedData); 

// Signal the completion of processing the chunk 
callback(); 
} 
}); 

// Readable stream 'data' event handler 
uppercaseTransformStream.on('data', (chunk) => { console.log(`Received transformed data: ${chunk}`); }); 

// Write a classic "Princess Bride" quote to the Transform stream uppercaseTransformStream.write('Have fun storming the castle!'); uppercaseTransformStream.end();

Transform streams empower developers to apply flexible data transformations while data traverses through them, enabling customised processing to suit specific needs.

In the provided code snippet, we utilise the Transform class from the stream module to create a Transform stream. Inside the stream’s options, we define the transform() method to handle data transformation, which in this case converts incoming data to uppercase. We push the transformed data with this.push() and signal completion using callback().

To handle the readable side of the Transform stream, we attach an event handler to its data event. Writing data is done with the write() method, and we end the process with end().

Transform streams enable flexible data transformations as data moves through them, allowing for customised processing. A solid understanding of these stream types empowers developers to choose the most suitable one for their needs.

Using Node.js Streams

To gain practical insight into the utilisation of Node.js streams, let’s embark on an example where we read data from one file, apply transformations and compression, and subsequently write it to another file using a well-orchestrated stream pipeline.

const fs = require('fs'); 
const zlib = require('zlib'); 
const { Readable, Transform } = require('stream'); 

// Readable stream - Read data from a file 
const readableStream = fs.createReadStream('classic_tale_of_true_love_and_high_adventure.txt', 'utf8'); 

// Transform stream - Modify the data if needed 
const transformStream = new Transform({ 
transform(chunk, encoding, callback) { 
// Perform any necessary transformations 
const modifiedData = chunk.toString().toUpperCase(); 
// Placeholder for transformation logic 
this.push(modifiedData); 
callback(); 
}, 
});

// Compress stream - Compress the transformed data 
const compressStream = zlib.createGzip(); 

// Writable stream - Write compressed data to a file 
const writableStream = fs.createWriteStream('compressed-tale.gz'); 

// Pipe streams together readableStream.pipe(transformStream).pipe(compressStream).pipe(writableStream); 

// Event handlers for completion and error 
writableStream.on('finish', () => { console.log('Compression complete.'); }); writableStream.on('error', (err) => { console.error('An error occurred during compression:', err); });

In this code snippet, we perform a series of stream operations on a file. We begin by reading the file using a readable stream created with fs.createReadStream(). Next, we use two transform streams: one custom transform stream (for converting data to uppercase) and one built-in zlib transform stream (for compression using Gzip). We also set up a writable stream with fs.createWriteStream() to save the compressed data to a file named ‘compressed-file.gz.’

In this example, we seamlessly connect a readable stream to a custom transform stream, then to a compression stream, and finally to a writable stream using the .pipe() method. This establishes an efficient data flow from reading the file through transformations to writing the compressed data. Event handlers are attached to the writable stream to gracefully handle finish and error events.

The choice between using .pipe() and event handling hinges on your specific requirements:

  • Simplicity: For straightforward data transfers without additional processing, .pipe() is a convenient choice.
  • Flexibility: Event handling offers granular control over data flow, ideal for custom operations or transformations.
  • Error Handling: Both methods support error handling, but events provide greater flexibility for managing errors and implementing custom error-handling strategies.

Select the approach that aligns with your use case. For uncomplicated data transfers, .pipe() is a streamlined solution, while events offer more flexibility for intricate data processing and error management.

Best Practices for Working with Node.js Streams

Effective stream management involves adhering to best practices to ensure efficiency, minimal resource consumption, and the development of robust, scalable applications. Here are some key best practices:

  • Error Management: Be vigilant in handling errors by listening to the ‘error’ event, logging issues, and gracefully terminating processes when errors occur.
  • High-Water Marks: Select appropriate high-water marks to prevent memory overflow and data flow interruptions. Consider the available memory and the nature of the data being processed.
  • Memory Optimization: Release resources such as file handles or network connections promptly to avoid unnecessary memory consumption and resource leakage.
  • Utilise Stream Utilities: Node.js offers utilities like stream.pipeline() and stream.finished() to simplify stream handling, manage errors, and reduce boilerplate code.
  • Flow Control: Implement effective flow control mechanisms, such as pause(), resume(), or employ third-party modules like ‘pump’ or ‘through2,’ to manage backpressure efficiently.

By adhering to these best practices, you can ensure efficient stream processing, minimal resource usage, and the development of robust, scalable Node.js applications.

Conclusion

In conclusion, Node.js streams emerge as a formidable feature, facilitating the efficient management of data flow in a non-blocking manner. Streams empower developers to handle substantial data sets, process real-time data, and execute operations with optimal memory usage. A deep understanding of the various stream types, including Readable, Writable, Duplex, and Transform, coupled with best practice adherence, guarantees efficient stream handling, effective error mitigation, and resource optimization. Harnessing the capabilities of Node.js streams empowers developers to construct high-performance, scalable applications, leveraging the full potential of this indispensable feature in the Node.js ecosystem.

In today’s world of modern applications, the demand for non-blocking or asynchronous programming has become paramount. The need to execute multiple tasks in parallel, all while ensuring that heavy operations don’t hinder the user interface (UI) thread, has led to the emergence of coroutines as a solution in modern programming languages. In particular, Kotlin has embraced coroutines as an alternative to traditional threads, offering a more streamlined approach to asynchronous execution.

Coroutine Features:

1. Lightweight and Memory-Efficient:

One of the standout features of coroutines is their lightweight nature. Unlike traditional threads, which can be resource-intensive due to the creation of separate stacks for each thread, coroutines make use of suspension. This suspension allows multiple coroutines to operate on a single thread without blocking it, thereby conserving memory and enabling concurrent operations without the overhead of thread creation.

2. Built-in Cancellation Support:

Coroutines come with a built-in mechanism for automatic cancellation. This feature ensures that when a coroutine hierarchy is in progress, any necessary cancellations can be triggered seamlessly. This not only simplifies the code but also mitigates potential memory leaks by managing the cancellation process more efficiently.

3. Structured Concurrency:

Coroutines embrace structured concurrency, which means they execute operations within a predefined scope. This approach not only enhances code organization but also helps in avoiding memory leaks by tying the lifecycle of coroutines to the scope in which they are launched.

4. Jetpack Integration: 

Coroutines seamlessly integrate with Jetpack libraries, providing extensive support for Android development. Many Jetpack libraries offer extensions that facilitate coroutine usage. Some even provide specialized coroutine scopes, making structured concurrency an integral part of modern Android app development.

5. Callback Elimination

When fetching data from one thread and passing it to another, traditional threading introduces tons of callbacks. These callbacks can significantly reduce the code’s readability and maintainability. Coroutines, on the other hand, eliminate the need for callbacks, resulting in cleaner and more comprehensible code.

6. Cost-Efficiency

Creating and managing threads can be an expensive operation due to the need for separate thread stacks. In contrast, creating coroutines is remarkably inexpensive, especially considering the performance gains they offer. Coroutines don’t have their own stacks, making them highly efficient in terms of resource utilization.

7. Suspendable vs. Blocking

Threads are inherently blocking, meaning that when a thread is paused (e.g., during a sleep operation), the entire thread is blocked, preventing it from executing any other tasks. Coroutines, however, are suspendable. This means that when a coroutine is delayed, it can yield control to other coroutines, allowing them to execute concurrently. This ability to suspend and resume tasks seamlessly enhances the overall responsiveness of an application.

8. Enhanced Concurrency

Coroutines provide a superior level of concurrency compared to traditional threads. Multiple threads often involve blocking and context switching, which can be slow and resource-intensive. In contrast, coroutines offer more efficient context switching, making them highly suitable for concurrent tasks. They can change context at any time, thanks to their suspendable nature, leading to improved performance.

9. Speed and Efficiency

Coroutines are not only lightweight but also incredibly fast. Threads are managed by the operating system, which introduces some overhead. In contrast, coroutines are managed by developers, allowing for fine-tuned control. Having thousands of coroutines working in harmony can outperform a smaller number of threads, demonstrating their speed and efficiency.

10. Understanding Coroutine Context

In Kotlin, every coroutine operates within a context represented by an instance of the CoroutineContext interface. This context defines the execution environment for the coroutine, including the thread it runs on. Here are some common coroutine contexts:

  • Dispatchers.Default: Suitable for CPU-intensive work, such as sorting a large list.
  • Dispatchers.Main: Used for the UI thread in Android applications, with specific configurations based on runtime dependencies.
  • Dispatchers.Unconfined: Allows coroutines to run without confinement to any specific thread.
  • Dispatchers.IO: Ideal for heavy I/O operations, such as long-running database queries.

Example:

CoroutineScope(Dispatchers.Main).launch {
  task1()
}
CoroutineScope(Dispatchers.Main).launch {
 task2()
}

Import following dependencies to build.gradle (app) level file

implementation "org.jetbrains.kotlinx:kotlinx-coroutines-core:x.x.x"
implementation "org.jetbrains.kotlinx:kotlinx-coroutines-android:x.x.x"
implementation "androidx.lifecycle:lifecycle-viewmodel-ktx:x.x.x"
implementation "androidx.lifecycle:lifecycle-runtime-ktx:x.x.x"

Types of Coroutine Scopes

In Kotlin coroutines, scopes define the boundaries within which coroutines are executed. These scopes help determine the lifecycle of coroutines and provide a structured way to manage them. Coroutin is always call suspend method or other coroutine method.

There are three primary coroutine scopes:

1. Global Scope

Coroutines launched within the global scope exist for the duration of the application’s lifecycle. Once a coroutine completes its task, it is terminated. However, if a coroutine has unfinished work and the application is terminated, the coroutine will also be abruptly terminated. Let’s imagine a situation when the coroutines have some work or instruction left to do, and suddenly we end the application, then the coroutines will also die, as the maximum lifetime of the coroutine is equal to the lifetime of the application.

Example:

import ...

class MainActivity : AppCompatActivity() {
    val TAG = "Main Activity"
    override fun onCreate(savedInstanceState: Bundle?) {
        super.onCreate(savedInstanceState)
        setContentView(R.layout.activity_main)
        GlobalScope.launch {
            Log.d(TAG, Thread.currentThread().name.toString())
        }
        Log.d("Outside Global Scope",  Thread.currentThread().name.toString())
    }
}

2. Lifecycle Scope

The lifecycle scope is similar to the global scope, but with one crucial difference: coroutines launched within this scope are tied to the lifecycle of the activity. When the activity is destroyed, any coroutines associated with it are also terminated. This ensures that coroutines do not continue running unnecessarily after the activity’s demise.

Example:

import ...

const val TAG = "Main Activity"
class MainActivity : AppCompatActivity() {
    override fun onCreate(savedInstanceState: Bundle?) {
        super.onCreate(savedInstanceState)
        setContentView(R.layout.activity_main)
 
           // launching the coroutine in the lifecycle scope
            lifecycleScope.launch {
                while (true) {
                    delay(1000L)
                    Log.d(TAG, "Still Running..")
                }
            }
 
            GlobalScope.launch {
                delay(5000L)
                val intent = Intent(this@MainActivity, SecondActivity::class.java)
                startActivity(intent)
                finish()
            }
    }
}

3. ViewModel Scope

The ViewMondel scope is akin to the lifecycle scope, but with a more extended lifespan. Coroutines lauched within this scope persist as long as the associated ViewModel is active. A ViewModel is a class that manages and stores UI-related data, making it a suitable scope for coroutines performing tasks tied to the ViewModel’s lifecycle.

Example:

import ...

class MyViewModel : ViewModel() {
  
    /**
     * Heavy operation that cannot be done in the Main Thread
     */
    fun launchDataLoad() {
        viewModelScope.launch {
            sortList()
            // Modify UI
        }
    }
  
    suspend fun sortList() = withContext(Dispatchers.Default) {
        // Heavy work
    }
}

Coroutines Functions

In Kotlin, two main functions are used to start coroutines:

  1. launch{ }
  2. async { }  

Using launch

The launch function is ideal when you need to perform an asynchronous task without blocking the main thread. It does not wait for the coroutine to complete and can be thought of as “fire and forget.”

Example:

private fun printSocialFollowers(){
        CoroutineScope(Dispatchers.IO).launch {
            var fb = getFBFollowers()
            var insta = getInstaFollowers()
            Log.i("Social count","FB - $fb, Insta - $insta")
        }
    }

    private suspend fun getFBFollowers(): Int{
        delay(1000)
        return 54
    }

    private suspend fun getInstaFollowers(): Int{
        delay(1000)
        return 113
    }

In the above example, getInstaFollowers() will wait for getFBFollowers() to finish executing, and after that, getFBFollowers() and getInstaFollowers() will be executed concurrently.

Using async

On the other hand, the async function is used when you require the result or output from your coroutine and are willing to wait for it. However, it’s important to note that async can block the main thread at the entry point of the await() function, so it should be used judiciously.

Here’s an example demonstrating the use of async:

private fun printSocialFollowers(){
        CoroutineScope(Dispatchers.IO).launch {
            var fb = async { getFBFollowers() }
            var insta = async { getInstaFollowers() }
            Log.i("Social count","FB - ${fb.await()}, Insta - ${insta.await()}")
        }
    }

    private suspend fun getFBFollowers(): Int{
        delay(1000)
        return 54
    }

    private suspend fun getInstaFollowers(): Int{
        delay(1000)
        return 113
    }

In the above example, both getFBFollowers() and getInstaFollowers() are called in parallel, reducing execution time compared to the launch function. However, it’s important to keep in mind that async should be used when you need the results and are prepared for potential blocking.

Conclusion

In conclusion, coroutines are a powerful tool for writing asynchronous code in a more readable and maintainable manner. By understanding the key concepts, how coroutines work, and how to use them effectively in practice, you can take advantage of the benefits they offer in modern programming. Whether you are a beginner or an experienced developer, this guide will provide you with the knowledge and resources to master coroutines and improve your programming skills.

Imagine yourself as an ice-cream vendor. You have a foundational ice-cream recipe, but to captivate your customers even more, you infuse various flavors into that base ice cream, resulting in an enticing range of newly flavored products. This concept, akin to enhancing ice cream with flavors, correlates with the notion of “Product Flavors” in the realm of Android app development. These flavors allow developers to create distinct versions of an app, each tailored to different scenarios, audiences, or requirements. Let’s delve into the intricacies of Product Flavors and their applications in this article.

The Significance of Product Flavors

In the multifaceted landscape of app development, there are scenarios where customization and versatility are paramount. Product Flavors emerge as a pivotal tool to address such scenarios. Consider these instances:

  • White Labeling: You’re delivering a product to multiple clients, each necessitating their own branding elements like logos, colors, and styles. Product Flavors empower you to cater to individual client preferences through a single codebase.
  • Distinct Endpoints: Your app interfaces with various backend services through different API endpoints. With Product Flavors, you can seamlessly switch between endpoints, catering to the requirements of different clients or environments.
  • Free and Paid Versions: Your app has both free and paid versions, each offering specific features. Product Flavors enable you to manage the variations between these versions efficiently, ensuring a smooth user experience.

Unveiling Product Flavors

As per the official definition from developer.android.com, Product Flavors encompass different versions of a project that are designed to coexist on a single device, the Google Play store, or a repository. They facilitate the creation of app variants that share common source code and resources, while allowing differentiation in terms of features, resources, and configurations.

Configuring Product Flavors

Let’s examine a scenario where you’re building an app with both ‘free’ and ‘paid’ versions. The build.gradle file plays a crucial role in configuring these variants. By employing the productFlavors block, you can define unique properties for each flavor:

android {
    namespace = "com.example.flavors"
    compileSdk = 33

    defaultConfig {
        applicationId = "com.example.flavors"
        minSdk = 27
        targetSdk = 33
        versionCode = 1
        versionName = "1.0"
    }
}

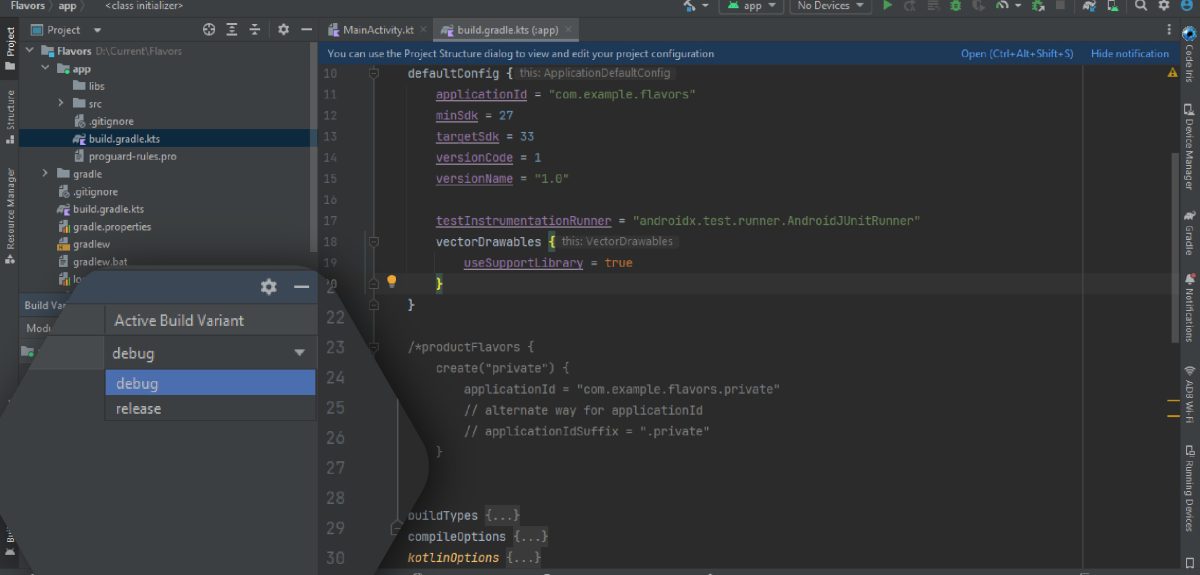
As per above config, your build-variants (build types) looks like this:

So, product flavors allow you to output different versions of your project by simply changing only the components and settings that are different between them.

This configuration allows you to maintain a single codebase while tailoring the app for different use cases. The ‘free’ and ‘paid’ flavors can possess distinct application IDs, version codes, version names, and more.

Customizing Product Flavors

Beyond the basic configurations, Product Flavors offer the flexibility to fine-tune each variant.

Now based on the above ‘free’ and ‘paid’ specifications, you will create another version of the same app. So your build.gradle file will look like this:

android {
    namespace = "com.example.flavors"
    compileSdk = 33

    defaultConfig {
        applicationId = "com.example.flavors"
        minSdk = 27
        targetSdk = 33
        versionCode = 1
        versionName = "1.0"
    }

    productFlavors {
        create("free") {
            applicationId = "com.example.flavors.free"
            // or applicationIdSuffix = ".free"
        }
        create("paid") {
            applicationId = "com.example.flavors.paid"
            // or applicationIdSuffix = ".paid"
        }
    }
}

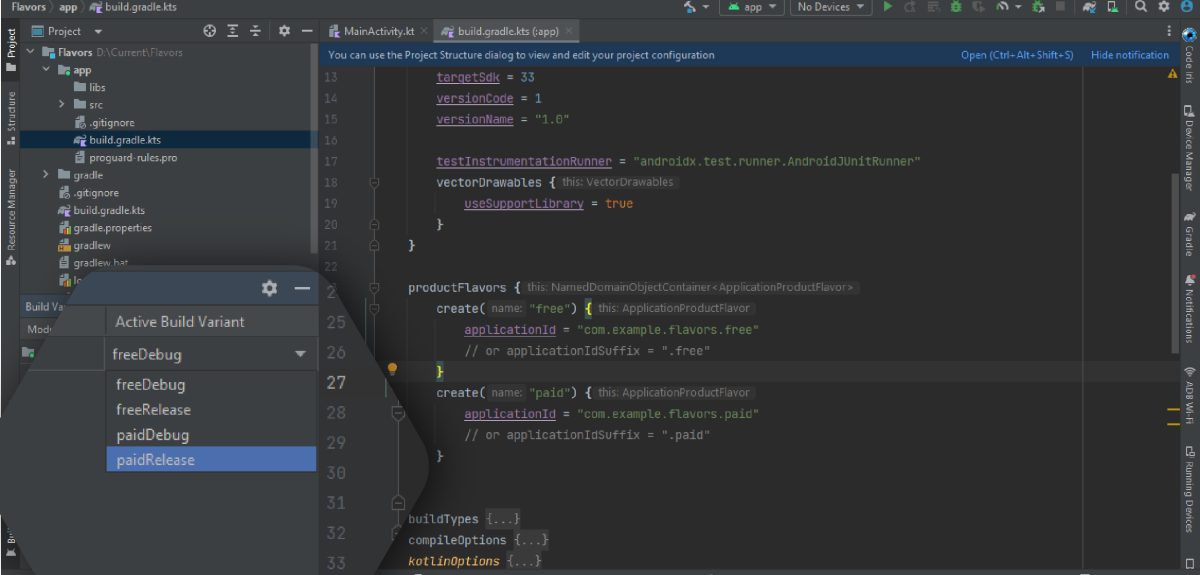
As a result, your build-variants will look like this:

You can define more properties that enable you to cater to specific client needs while maintaining code consistency such as:

create("free") {
    applicationId = "com.example.flavors.free"
    versionCode = 2
    versionName = "1.1"
    minSdk = 28
    targetSdk = 33
    buildConfigField("String", "HOST_URL", "\"www.flavors.com/free\"")
    manifestPlaceholders["enable_crashlytics"] = true
}

Diverse Build Variants

In Android app development, build variants play a pivotal role. By default, ‘debug’ and ‘release’ are the primary build types. Debug is the build type that is used when we run the application from the IDE directly onto the device. Release is the build type that is used when we create a signed APK/AAB for publishing on play-store.
However, there are scenarios where you need additional build variants, like for QA testing or client previews. These build variants, combined with Product Flavors, provide an arsenal of options to cater to diverse requirements. Whether it’s creating personalized versions for clients, managing different API endpoints, or offering distinct app versions, Product Flavors streamline the development process. This can be achieved through the buildTypes block:

buildTypes {
    // default
    getByName("release") {
        isMinifyEnabled = true
        proguardFiles(
            getDefaultProguardFile("proguard-android-optimize.txt"),
            "proguard-rules.pro"
        )
    }

    // default
    getByName("debug") {
        isMinifyEnabled = false
        isDebuggable = true
        applicationIdSuffix = ".debug"
        android.buildFeatures.buildConfig = true
        buildConfigField("String", "HOST_URL", "\"www.dev-flavors.com\"")
    }

    // created staging build-type
    create("staging") {      
        initWith(getByName("debug"))
        applicationIdSuffix = ".debugStaging"
        buildConfigField("String", "HOST_URL", "\"www.staging-flavors.com\"")
    }


    // created qa build-type
    create("qa") {
        applicationIdSuffix = ".qa"
        buildConfigField("String", "HOST_URL", "\"www.qa-flavors.com\"")
    }
}

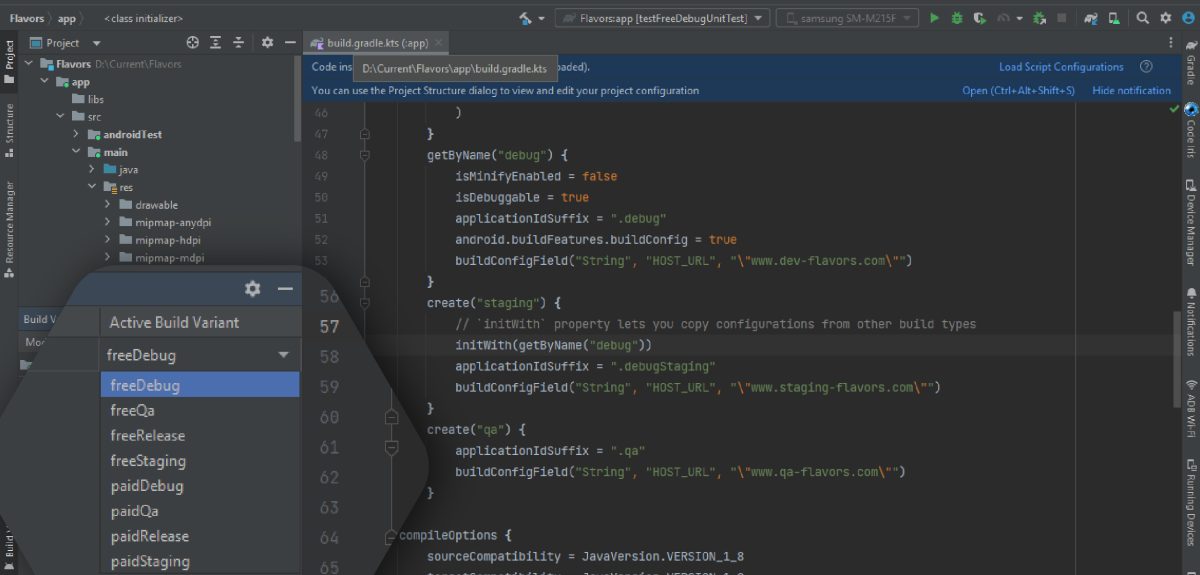
Now your build-variants look like this:

This is how you can create different versions of your app for different purposes, using a single code-base and different configuration.

Selenium is one of the most prominent test frameworks used to automate user actions on the product under test. With its capability to revolutionise web testing by providing a robust automation framework, Selenium has become an indispensable tool for software testing professionals. However, like any technological marvel, Selenium test automation isn’t without its own set of challenges. In this comprehensive blog post, we’ll delve into the intricacies of Selenium test automation, exploring some common challenges that testers encounter and, more importantly, providing insightful solutions to overcome these hurdles.

1. Dynamic Web Elements

Challenge: The modern landscape of web applications is dominated by dynamic elements. These elements have an inherent nature of altering their attributes or positions post page loads or interactions, which often results in failures during element identification.

Solution: Combatting this challenge requires employing a variety of strategies to handle dynamic elements effectively:

Utilise Unique Attributes: It’s prudent to identify elements using attributes that are less susceptible to change. Employing these attributes ensures a more stable test environment.

WebElement element = driver.findElement(By.id("dynamic-element-id"));

Leverage CSS Selectors: CSS selectors emerge as a powerful option, providing flexibility in targeting elements based on attributes, classes, or positions.

WebElement element = driver.findElement(By.cssSelector(".dynamic-class"));

2. Cross-Browser Compatibility

Challenge: The dynamic nature of web applications necessitates seamless functionality across different browsers and versions. Ensuring this cross-browser compatibility can be a tedious and time-consuming task.

Solution: Overcoming cross-browser compatibility challenges can be achieved by following these steps:

Browser-Specific WebDriver: Selenium offers browser-specific drivers, enabling testers to ensure compatibility with various browsers.

import org.openqa.selenium.WebDriver;
import org.openqa.selenium.chrome.ChromeDriver;
import org.openqa.selenium.firefox.FirefoxDriver;
import org.openqa.selenium.edge.EdgeDriver;

WebDriver driver = new ChromeDriver(); 

3. Flakiness of Tests

Challenge: The vexing problem of test flakiness can be highly frustrating. Tests that pass sometimes and fail other times can be difficult to debug and impact the reliability of the testing process.

Solution: To combat test flakiness, adopt the following strategies:

Explicit Waits: Using explicit waits instead of  implicit waits ensures that elements load before interactions occur.

import org.openqa.selenium.By;
import org.openqa.selenium.WebDriver;
import org.openqa.selenium.WebElement;
import org.openqa.selenium.support.ui.ExpectedConditions;
import org.openqa.selenium.support.ui.WebDriverWait;

WebDriverWait wait = new WebDriverWait(driver, 10);
WebElement element = wait.until(ExpectedConditions.presenceOfElementLocated(By.id("element-id")));

Reduced Reliance on Sleep Statements: Avoid Thread.sleep() to eliminate unnecessary delays. Employ more adaptive waits responsive to element visibility.

4. Handling Pop-ups and Alerts

Challenge: The intrusion of pop-ups, alerts, and dialogs in automation scripts can disrupt the script’s flow, leading to challenges in maintaining test reliability.

Solution: Tackling pop-ups and alerts can be achieved through the following steps:

Leveraging the Alert API: WebDriver provides an Alert API to manage JavaScript alerts, prompts, and confirmations.

import org.openqa.selenium.Alert;

// ...

Alert alert = driver.switchTo().alert();
alert.accept();  // or alert.dismiss(), alert.sendKeys(), etc.

5. Data-Driven Testing

Challenge: The complexity of implementing and managing tests with varied data inputs poses a significant hurdle in the testing process.

Solution: To simplify data-driven testing, consider the following strategies:

Utilise External Data Sources: Store test data in external files such as CSV, Excel, or JSON, and dynamically read them within your tests.

import java.io.BufferedReader;
import java.io.FileReader;
import java.io.IOException;
// ...
try (BufferedReader br = new BufferedReader(new FileReader("test_data.csv"))) {
    String line;
    while ((line = br.readLine()) != null) {
        // Parse and use data for testing
    }
} catch (IOException e) {
    e.printStackTrace();
}

Parameterized Testing: Utilise testing frameworks like TestNG to parameterize test methods and execute them with diverse data sets.

6. Test Maintenance

Challenge: As web applications evolve, automation tests can become obsolete, necessitating frequent updates to ensure their continued effectiveness.

Solution: Effective management of test maintenance requires adopting the following practices:

Embrace Page Object Model (POM): Implement a structured approach through POM to segregate page elements and interactions from test logic.

public class LoginPage {
    private WebDriver driver;
    private WebElement usernameInput;
    private WebElement passwordInput;
    private WebElement loginButton;

    public LoginPage(WebDriver driver) {
        this.driver = driver;
        // Initialize elements
    }
    public void login(String username, String password) {
        usernameInput.sendKeys(username);
        passwordInput.sendKeys(password);
        loginButton.click();
    }
}

Regular Review and Updates: As the application evolves, ensure timely updates to align tests with the current application state.

7. Limited Reporting

Challenge: Reporting plays a pivotal role in the testing phase, bridging the gap between testers and developers. Selenium, however, lacks robust reporting capabilities.

Solution: To address this limitation, harness programming language-based frameworks that offer enhanced code designs and reporting. Frameworks such as TestNG and Gauge provide insightful reports to aid in the testing process.

Conclusion

Selenium test automation brings an array of benefits, but navigating its challenges requires a strategic mindset and a commitment to learning. Dynamic elements, cross-browser compatibility, test flakiness, pop-ups handling, data-driven testing, and test maintenance are just a subset of the challenges Selenium enthusiasts encounter. By applying patience, continuous learning, and a proactive problem-solving approach, you can craft a suite of automation tests that elevate the quality and efficiency of your web development projects.

Each challenge serves as an opportunity for growth, pushing you to experiment, innovate, and refine your Selenium testing skills. Embrace these challenges, explore the solutions provided, and cultivate a mastery that positions you as a skilled test automation engineer in the ever-evolving world of software testing.

In the dynamic landscape of Selenium test automation, challenges are not roadblocks; they are stepping stones to innovation. With Scalybee Digital‘s advanced solutions, conquer these challenges and elevate your testing prowess to new heights.

In the ever-evolving landscape of web development, the power of modern browsers has enabled the creation of dynamic and feature-rich web applications. However, this progress comes hand-in-hand with potential security vulnerabilities. Issues like cross-site scripting (XSS), SQL injections, and path traversals have become alarmingly common. Imagine a scenario where your JavaScript dependencies unknowingly leak sensitive information like passwords to a third-party website. This is where Content Security Policy (CSP) comes into play, offering a robust solution to mitigate such security risks.

What Is CSP? Understanding the Armor for Your Web Application

A Content Security Policy (CSP) is a set of directives that determine which types of content can be included, displayed, and executed on a web page. These directives provide a shield against malicious scripts and unauthorised data exchanges. CSPs are delivered as custom HTTP headers or embedded within a <meta> tag within the HTML page’s <head>. While the <meta> tag is a functional option, the HTTP header approach is favoured for its clear separation between content and metadata. When a browser encounters a CSP, it intercepts content-loading attempts and either blocks or reports content that violates the defined rules.

Adding CSP to Your Laravel Application: A Step-by-Step Guide

Implementing CSP in your Laravel application doesn’t have to be a daunting task. While you could manually integrate the header in your route controllers or design custom middleware, there’s an easier way. The open-source package provided by Spatie, a reputable Belgian Laravel-specialised company, simplifies the process. To get started, execute the following commands in your console:

composer require spatie/laravel-csp

Note: spatie/laravel-csp is a package provided by Spatie.

php artisan vendor:publish --tag=csp-config

This package boasts a “Basic” policy with sensible defaults, including permitting all content types when sourced from the same domain and supporting nonces for inline scripts. If your needs align with these defaults, the “Basic” policy is pre-activated upon installation. The final step involves enabling the CSP middleware. For global application, add the middleware to the $middleware or $middlewareGroups in your App\Http\Kernel class:

protected $middlewareGroups = [
   'web' => [
       ...
       \Spatie\Csp\AddCspHeaders::class,
   ],
]

Alternatively, you can apply the policy selectively by adding it to specific routes:

Route::get('my-page', 'MyController')->middleware(Spatie\Csp\AddCspHeaders::class);

Crafting Custom Policy : Tailoring Security for Your Application’s Needs

In cases where your web application demands integration with external services like Facebook, the “Basic” policy might fall short. To accommodate such scenarios, let’s delve into crafting a custom policy. Begin by creating a new file, app/ContentPolicy.php, containing:

<?php
namespace App;
use Spatie\Csp\Directive;
use Spatie\Csp\Policies\Basic;

class ContentPolicy extends Basic
    {
        public function configure()
        {
            parent::configure();
            $this->addDirective(Directive::DEFAULT, '*.facebook.net');
            $this->addDirective(Directive::DEFAULT, '*.facebook.com');
        }
    }
}

Above code will allow  ‘*.facebook.net’ and ‘*.facebook.com’, to instruct Laravel to utilise this custom policy instead of the default basic policy, edit config/csp.php file as follows:

<?php
return [
    /*
    * A policy will determine which CSP headers will be set. A valid CSP policy is
    * any class that extends `Spatie\Csp\Policies\Policy`
    */
    //'policy' => Spatie\Csp\Policies\Basic::class,
    'policy' => App\ContentPolicy::class,
…
];

Differentiating Directives: A Window into CSP Rule Customization

You can use the addDirective() method in your policy file to add additional rules to your policy. It has dual parameters. The first parameter specifies the type of content or fetch action and the origin of the content. For instance, Directive::IMG applies exclusively to fetching images, while Directive::MEDIA caters to embedded audio and video content. Other commonly used directives include Directive::SCRIPT for scripts and Directive::STYLE for stylesheets. The second parameter can be a domain with wildcards or a keyword like Keyword::SELF for the page’s source, and Keyword::NONE disables this type of content for any origin.

public function configure()
    {
        $this
            ->addDirective(Directive::BASE, Keyword::SELF)
            ->addDirective(Directive::CONNECT, Keyword::SELF)
            ->addDirective(Directive::DEFAULT, Keyword::SELF)
            ->addDirective(Directive::FORM_ACTION, Keyword::SELF)
            ->addDirective(Directive::IMG, Keyword::SELF)
            ->addDirective(Directive::MEDIA, Keyword::SELF)
            ->addDirective(Directive::OBJECT, Keyword::NONE)
            ->addDirective(Directive::SCRIPT, Keyword::SELF)
            ->addDirective(Directive::STYLE, Keyword::SELF)
            ->addNonceForDirective(Directive::SCRIPT)
            ->addNonceForDirective(Directive::STYLE);
    }

Enhancing Security with Nonces: Unveiling an Extra Layer of Protection

Nonces, unique numbers changing with each request, bring an additional layer of security to your web application. The browser exclusively executes scripts possessing the correct nonce. Laravel’s CSP plugin simplifies nonce generation, automatically adding them to the Content-Security-Policy header.

<style nonce="{{ csp_nonce() }}">
...
</style>
<script nonce="{{ csp_nonce() }}">
...
</script>

Summing Up the Shield: A Secure Future for Your Web App

In conclusion, integrating a content security policy into your web application’s arsenal significantly reduces the risk of injection-style attacks. A CSP functions as an HTTP header with granular directives dictating the permissible content sources. This package not only empowers you to add CSPs effortlessly but also handles nonces for securing inline scripts and styles, streamlining the deployment of CSP.

Introduction

In this post, we will explore the exciting area of integrating OpenAI’s powerful language into your Laravel-based web applications. Laravel, a popular PHP framework renowned for its elegance and flexibility, serves as the foundation for creating feature-rich web experiences. By combining Laravel’s capabilities with OpenAI’s advanced language processing prowess, we unlock the potential to provide web applications with unparalleled natural language processing abilities.

Step 1: Create New Project

Let’s kick off our journey by establishing a new Laravel project using Composer or using an existing Laravel project.

Screenshot: Creating a New Laravel Project with Composer or Using an Existing Project

Step 2: Install the OpenAI PHP Package

To seamlessly integrate OpenAI’s capabilities, we turn to the openai-php/client package. This package facilitates interaction with the API endpoint, enabling us to harness the potential of OpenAI. It’s important to note that this package requires PHP 8.1+. The package’s source code can be explored further on its GitHub repository: openai-php/client.

Screenshot: Installing the OpenAI PHP Package for Seamless Integration

Step 3: Register to OpenAI

Before starting the integration process, we need to secure access to the OpenAI API. You need to sign up on the OpenAI website and generate API keys for authentication. 

Once signed up, go to https://platform.openai.com/account/api-keys and click the button.

Screenshot of openai window.

These keys grant us the privilege of accessing OpenAI’s capabilities. The generated secret keys need to be copied, and put in our .env file inside our Laravel project.

Screenshot of API key

Step 4: Create Routes

With the work done, it’s time to create routes within our application. Create a route in a web.php file.

Screenshot: Creating Routes in Laravel's web.php File

Step 5: Create Blade File

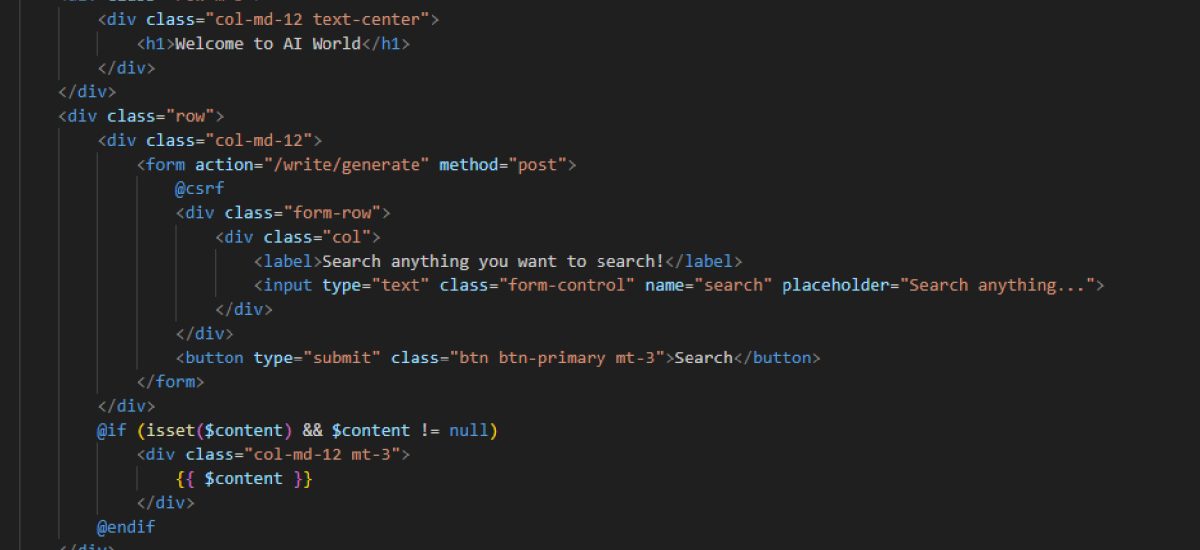
Our next step involves crafting a dedicated blade file, openai.blade.php, to display the magic of OpenAI in action. We will create a resources/view/openai.blade.php blade file for the view.

Screenshot: Creating the openai.blade.php Blade File for OpenAI Integration

Step 6: Create Controller

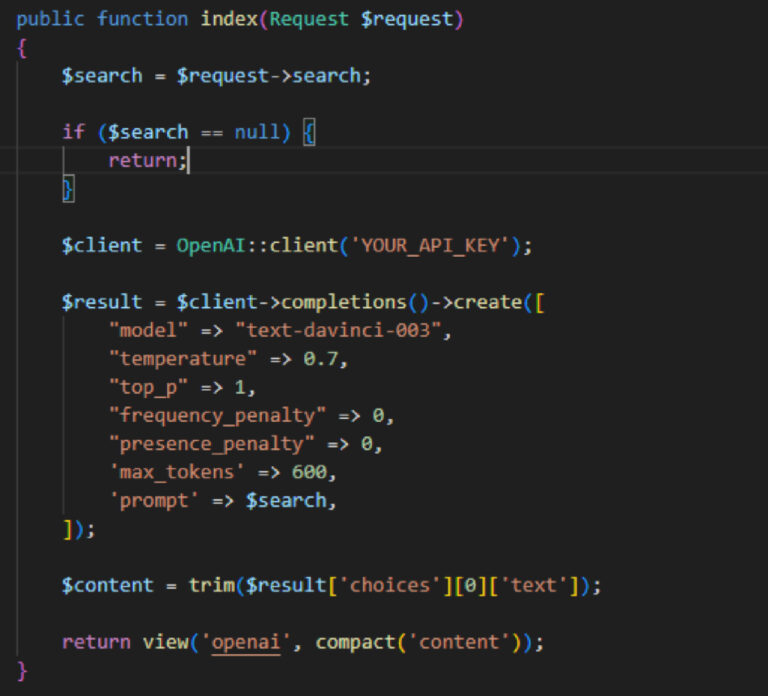
In this step, we embark on the creation of the ArticleGeneratorController.php file using the following command.

Screenshot: Creating ArticleGeneratorController.php

After making the controller do logic as below for interaction and search of the content.

Screenshot: Implementing Controller Logic for Content Interaction

Step 7: Run Laravel Application

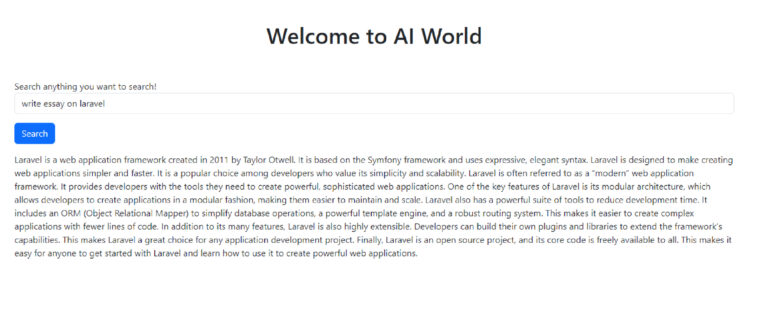
With the pieces falling into place, it’s time to set our creation into motion. By using the following command, the application allows us to witness the integration’s outcome.

Screenshot: Running the Laravel Project to Launch the Integrated Application
Screenshot: Displaying the Output of the Integration Process

Conclusion

In wrapping up this tutorial, we reflect on the journey we undertook to fuse OpenAI’s prowess with Laravel’s robustness. The tutorial guided us through the creation of a Laravel project, installation of the OpenAI PHP package, API key registration, route and blade file creation, controller implementation, and finally, the exhilarating moment of running the application. The integration of OpenAI opens a realm of possibilities for crafting intelligent and sophisticated web applications. As you venture forward, experiment with the OpenAI API, tap into its capabilities, and elevate your Laravel applications to new echelons of intelligence and functionality.

Community management plays a pivotal role in fostering strong bonds and meaningful interactions within religious and other communities. However, it is not without its challenges. From organising events and managing finances to engaging members effectively, community leaders often face a myriad of complex tasks. But fear not! An extraordinary solution is on the horizon, poised to revolutionise community management for leaders and members alike. In this blog, we will delve into the pain points of community management, explore the anticipated solution, and envision the future of efficient, seamless community engagement.

Image representing a united community with fingers forming eyes, nose, and lips. Empowering Your Community, Revolutionising Management, Discover Community Management.

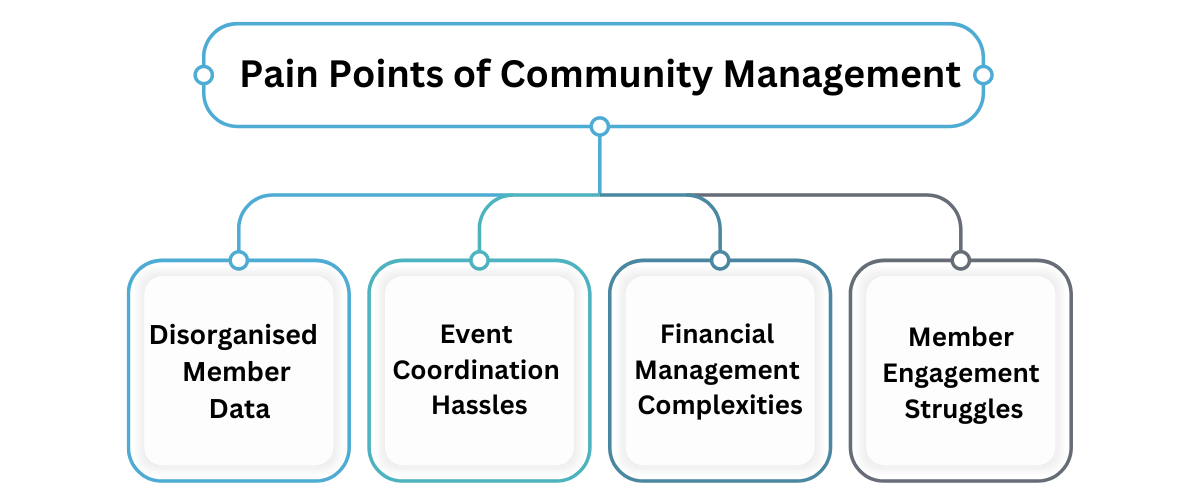
The Pain Points of Community Management

Managing a community, whether small or large, comes with its share of hurdles. Here are some common pain points experienced by community leaders:

  • Disorganised Member Data: 

Keeping track of member information, including contact details and preferences, can be cumbersome when relying on outdated manual systems. This often leads to inefficiencies and lost opportunities for meaningful connections.

  • Event Coordination Hassles: 

Coordinating community events, workshops, and gatherings can become chaotic without a centralised platform for seamless communication and scheduling. This lack of organisation may deter members from actively participating in community activities.

  • Financial Management Complexities: 

Tracking donations, managing budgets, and generating financial reports manually can be time-consuming and prone to errors. Community leaders need a streamlined system to ensure transparent and accurate financial management.

  • Member Engagement Struggles: 

Keeping community members informed and engaged is vital for fostering a sense of belonging and active participation. However, without an efficient communication system, disseminating timely updates and news becomes challenging.

Visual representation of community management pain points: Disorganized member data, event coordination hassles, financial management complexities, and member engagement struggles

The Anticipated Solution: A Glimpse into the Future

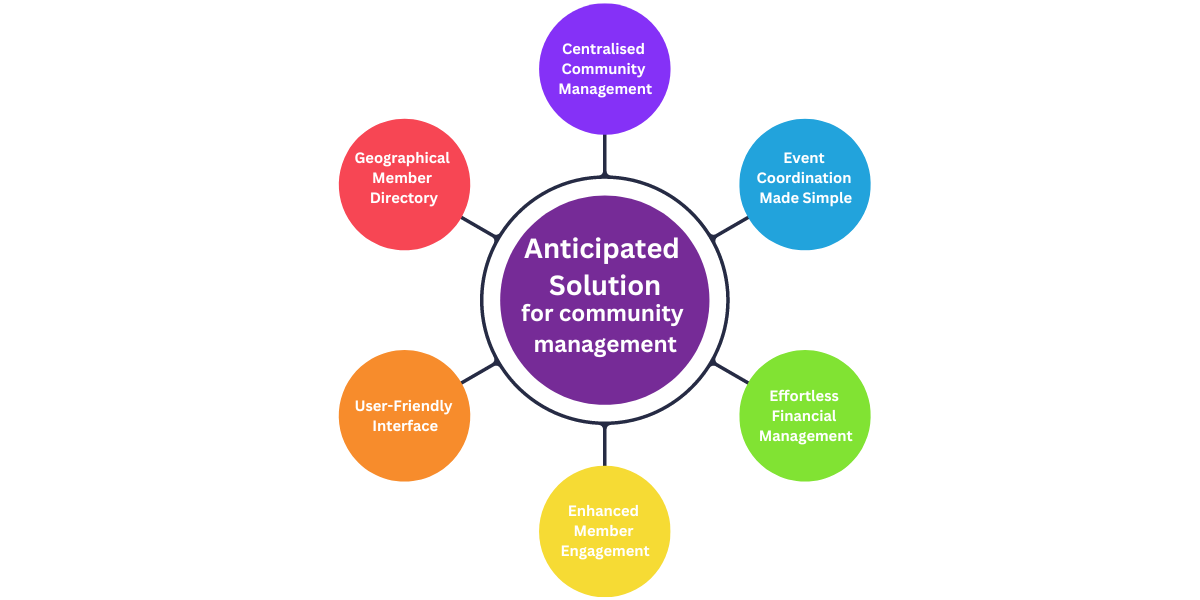
Imagine a powerful platform that addresses all these pain points and more – a platform designed to enhance community management with cutting-edge technology. We are excited to introduce an innovative solution that will reshape the way community leaders and members interact and collaborate.

Infographic depicting the anticipated solution for community management, featuring centralised community management, simplified event coordination, effortless financial management, enhanced member engagement, user-friendly interface, and geographical member directory

Centralised Community Management: 

Our anticipated platform will offer a centralised system that streamlines member data management. From personal details to preferences and participation history, everything will be at your fingertips, eliminating disorganisation and promoting seamless connections.


Event Coordination Made Simple: 

With the platform’s advanced event coordination tools, planning community activities will be a breeze. From scheduling to registration management, every aspect of event coordination will be automated, ensuring smooth execution and maximum participation.


Effortless Financial Management: 

Say goodbye to manual bookkeeping. The platform will provide an intuitive financial management system, enabling community leaders to track donations, allocate funds, and generate accurate financial reports with ease.


Enhanced Member Engagement: 

Engaging community members will be more accessible than ever before. The platform’s communication features will empower leaders to share news, updates, and announcements in real-time, fostering a vibrant and connected community.
 

User-Friendly Interface: 

Intuitively designed with user experience in mind, the platform will be easy to navigate for both leaders and members. The intuitive interface will encourage active participation, making community management an enjoyable experience for all.


Geographical Member Directory: 

The platform will boast a comprehensive geographical member directory, enabling community leaders to locate and connect with members based on their location. Whether it’s planning local events or facilitating neighbourhood collaborations, this feature will foster a sense of unity and community spirit.

Anticipating the Launch: Join Us on This Journey

We understand the eagerness to explore this transformative platform. The anticipation is palpable as we prepare for the big launch, where community leaders will experience a new era of community management. The platform’s user-friendly design and powerful features are sure to redefine the way communities interact and thrive.

As we eagerly await the unveiling, we invite you to join us on this journey. Stay tuned for updates and sneak peeks as we prepare to launch the platform that will empower community leaders, engage members, and foster a sense of belonging that knows no boundaries.

Embracing the Future of Community Management

The future of community management is brighter than ever before. With this groundbreaking platform, leaders will have the tools to strengthen their communities, nurture meaningful connections, and inspire members to actively engage. Imagine a future where community management is a joyful experience, where leaders can focus on building relationships and fostering growth without being bogged down by administrative burdens.
Together, we can transform community management and revolutionise the way communities come together. The launch of this platform represents the start of an exciting new chapter, and we can’t wait to embark on this journey with you.

So, are you ready to embrace the future of community management? Stay tuned for updates, and get ready to take your community to new heights with this cutting-edge solution!

We’ve been working tirelessly behind the scenes, crafting something extraordinary just for YOU – our fantastic community of supporters! And we can’t wait to share it with you all! 

Stay tuned for the big reveal! You won’t want to miss this game-changing moment!

Image of a megaphone with text 'New Community Management Tool Coming Soon. Stay Tuned!
“Livewire’s mission to require less of developers to take you where you are and give you superpowers” – Caleb Porzio 

Get ready for the ultimate upgrade! 🚀 Laravel Livewire Version 3 is here and it’s bigger, better, faster, and more robust than ever before! 🎉✨

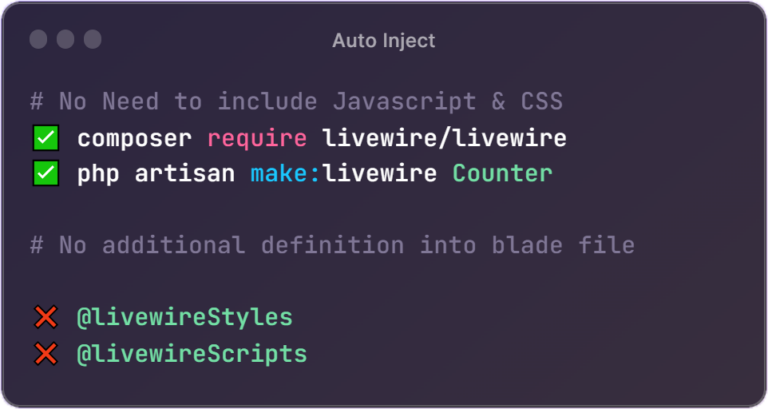
No More Manual Setup!

With Livewire v3, setting up is a breeze! There is no need of manual injections, simply install Livewire and everything you need is automatically injected – including Alpine! 

With Livewire v3, you'll just install Livewire and everything you need is automatically injected - including Alpine!

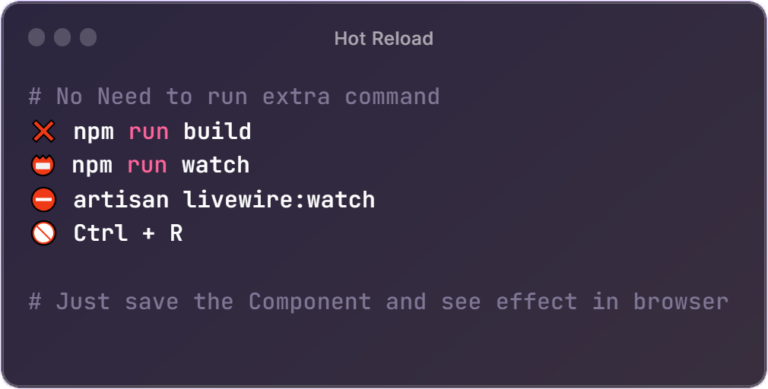
Hot Reloading Support

No More Build Steps! Running npm run watch or npm run build is now a thing of the past. Livewire v3 supports hot reloading without losing the state, making it feel like pure magic!

Hot reaload in livewire v3

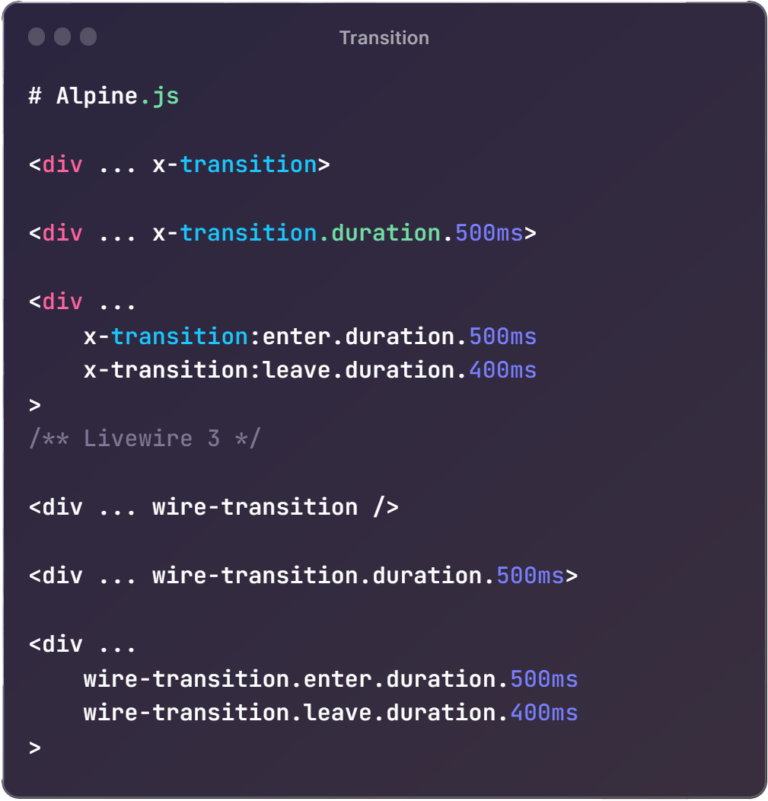
Smoother Transitions with Alpine!

Livewire v3 now adds support for the Alpine transition to the Livewire Component. Experience seamless, elegant transitions with ease!

Transition in Livewire v3

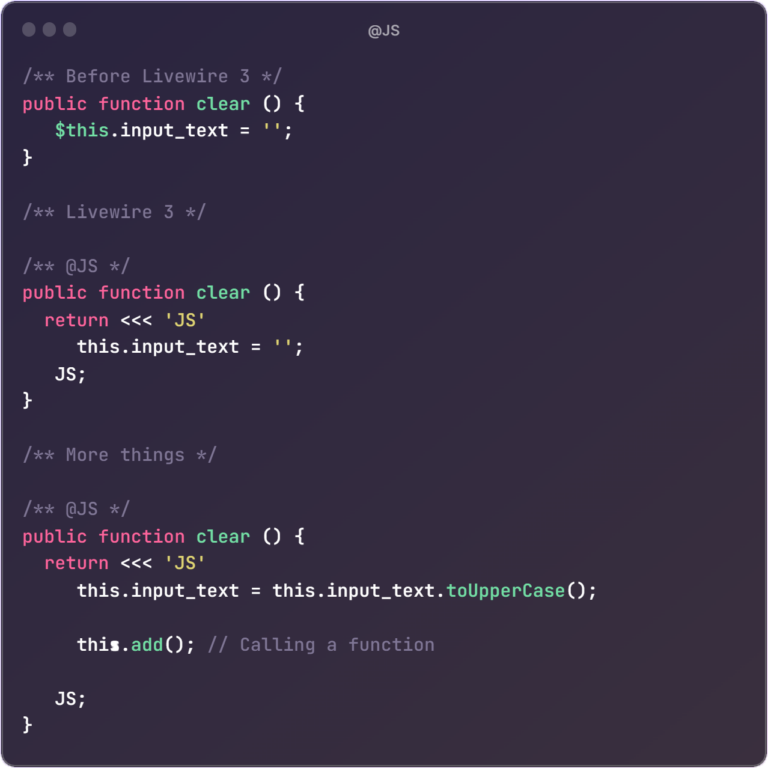
Introducing /** @js */ Annotation!

Prior to Livewire v3, any action on a Livewire component triggered a server hit, leading to unnecessary HTTP requests for simple browser-side tasks, like clearing an input text field.

With Livewire v3’s new JavaScript support, you can now perform JavaScript-related tasks directly in the Livewire Component file. This eliminates the need for unnecessary server requests and opens up possibilities for utilizing JavaScript functions within your components.

Js support in laravel livewire v3

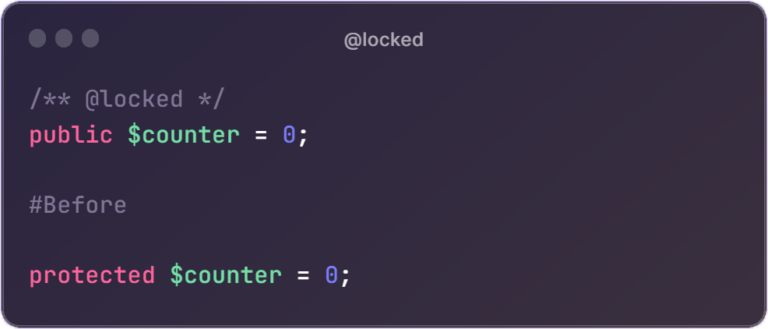
Secure Your Data with /** @locked  */ Annotation!

Livewire v3 brings added peace of mind with the /** @locked  */ annotation. Safeguard your variables with ease! 

Locked property in livewire3

Enhance Your Data Management with  /** @format */ Annotation!

This innovative feature allows seamless management of front-end input string type data with precision and ease, thanks to the defined component variable types.

With the /** @format */ annotation, you can ensure that your input data adheres to specific formats, making data handling and validation more efficient. Whether it’s dates, currencies, or any other custom format, Livewire v3 empowers you to define the expected structure and maintain data integrity effortlessly.

format annotation in laravel livewire

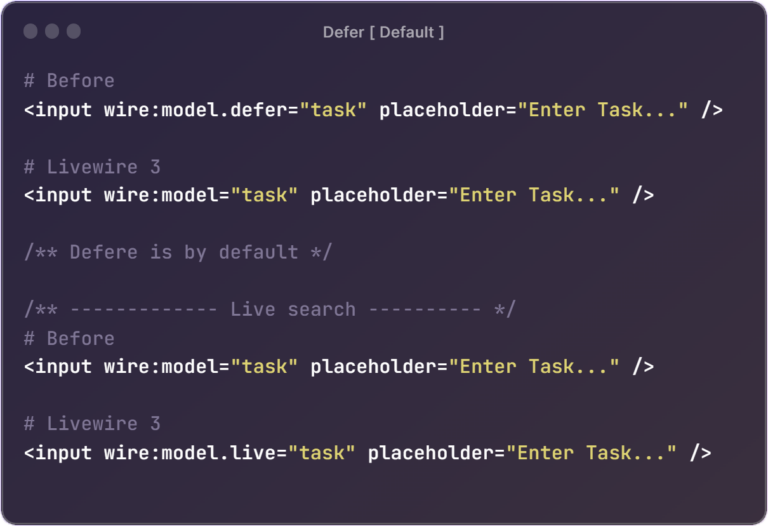
Improved Data Handling with Defer [ Default ] Annotation!

Livewire v3 brings a game-changing update with the introduction of wire:model.defer as the default behavior. This significant change is designed to optimize your Livewire experience, effectively reducing unnecessary HTTP request calls.

Now, with wire:model.defer, you can efficiently manage your data updates and ensure smoother interactions within your Livewire components. However, we understand that some may prefer the old model change behavior. Don’t worry, you can easily revert to it by using ‘wire:model.live’.

defer default in laravel livewire v3

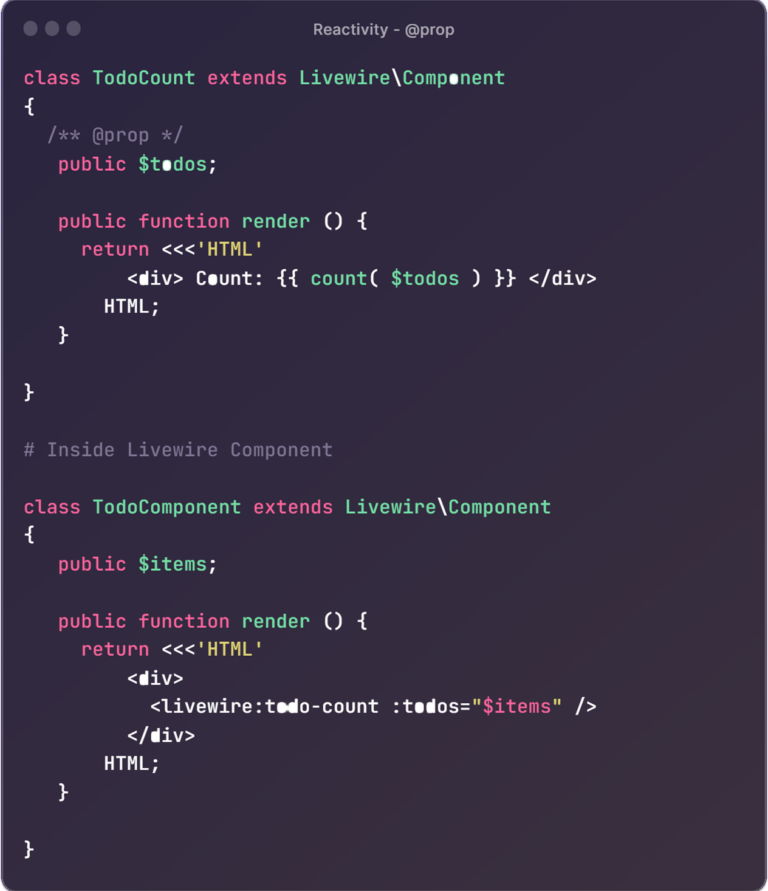
Effortless Reactivity with /** @prop */ Annotation!

In the past, when incorporating nested components within a parent component and passing data through props, we encountered challenges where the child component wouldn’t reflect the latest data changes from the parent. Livewire v3 introduces an invaluable reactivity feature, resolving this issue seamlessly.

With the /** @prop */  annotation, Livewire v3 empowers us to achieve the desired reactivity we lacked previously. Now, upon updating props data, the component will efficiently re-render, ensuring synchronization between parent and child components.

Prop annotation in laravel livewire v3

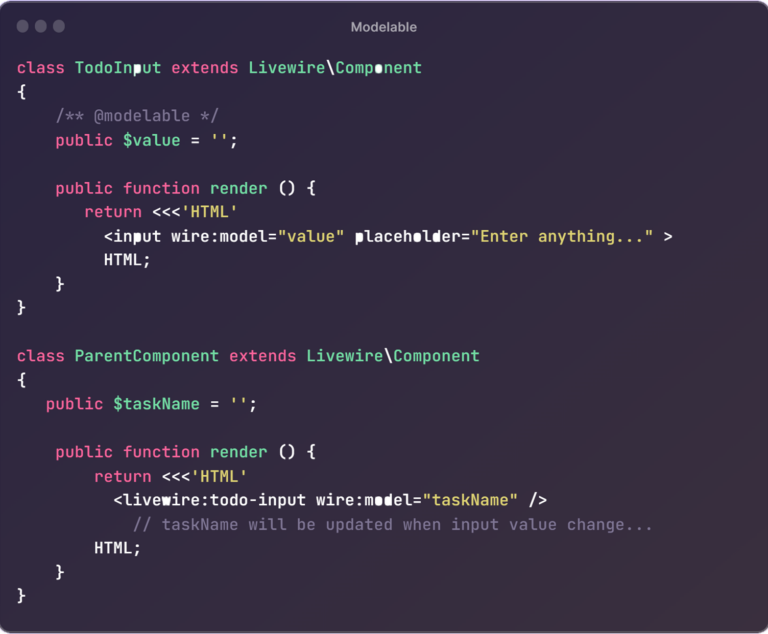
Seamlessly Control Model Values with /** @modelable */ Annotation !

Livewire v3 introduces /** @modelable */, making it a breeze to update model values in nested components. Experience smooth synchronization like never before!

modelabel annotation in laravel livewire v3

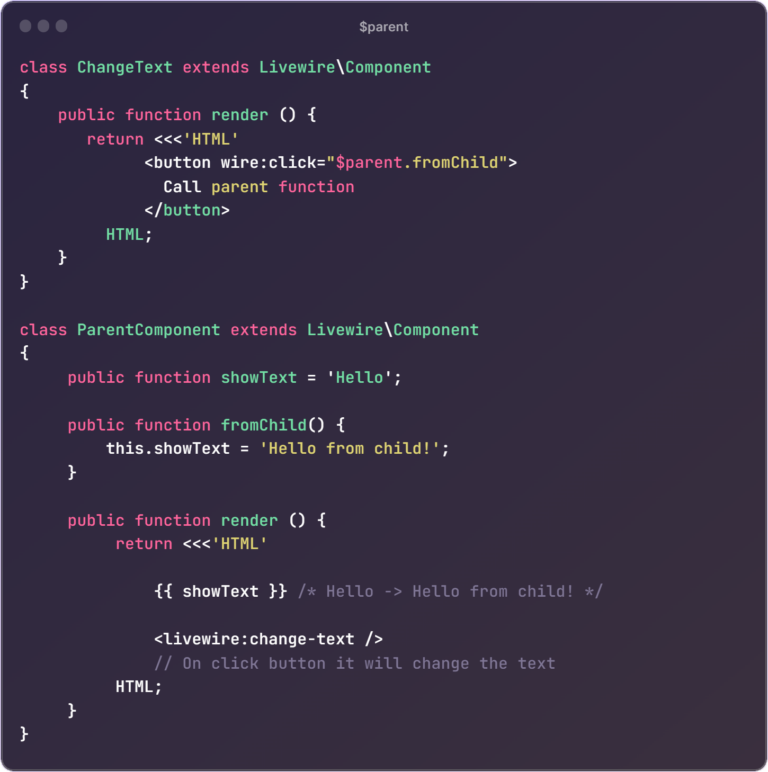
Empower Nested Components with $parent Annotation

Connect nested components to the parent like never before! Introducing the $parent variable to call actions within the parent component directly from nested ones.

parent feature in laravel livewire v3

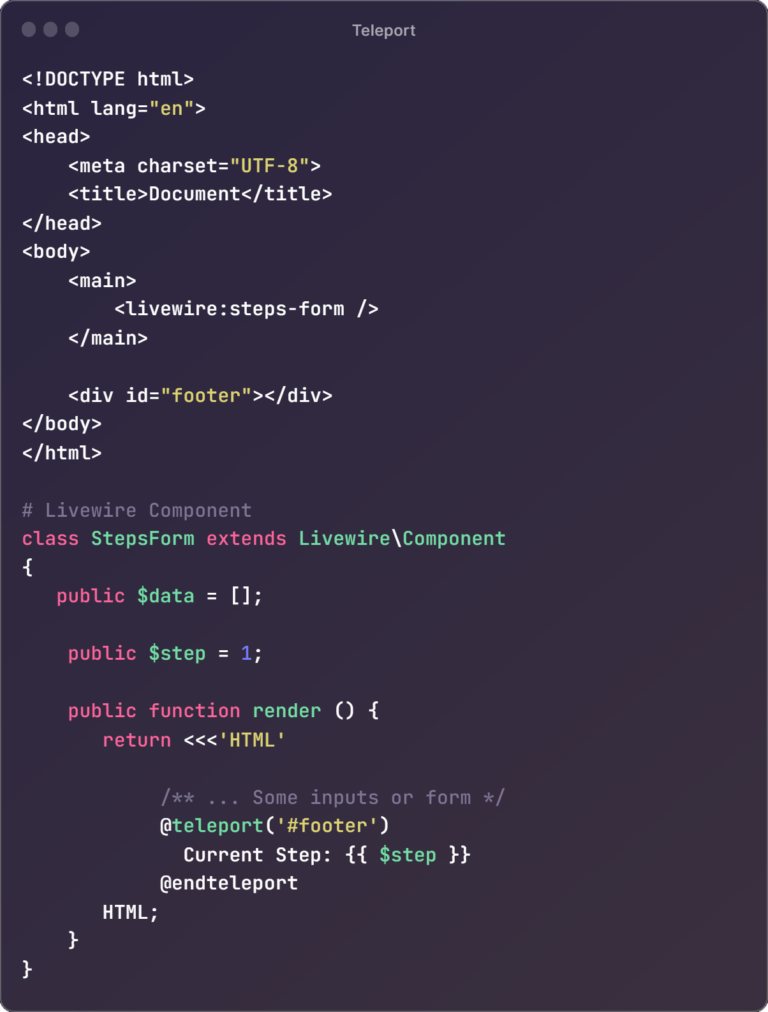
@teleport – Effortless Component Placement!

Transport your Livewire v3 components to any specific element with ease using @teleport(‘QUERY_SELECTOR’). Unleash the potential of Teleport! 

teleport feature in laravel livewire v3

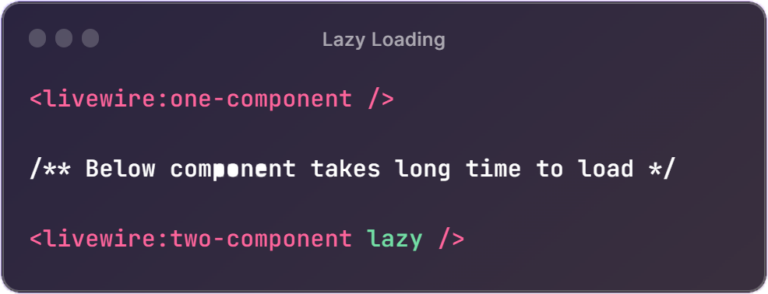
Load Components Instantly with Lazy Loading!

Say goodbye to slow-loading pages with multiple Livewire components. Livewire v3 introduces lazy loading, ensuring instant page loads and seamless user experiences.

lazy loading feature in laravel livewire v3

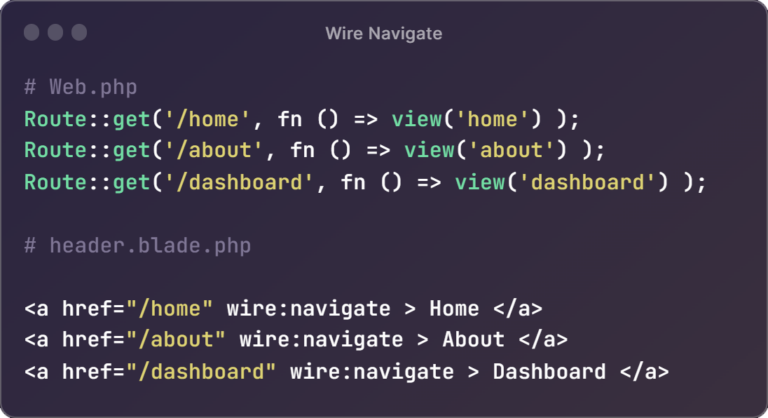
wire:navigate – Explore Like Never Before!

Make your app feel like a single-page application without any JS framework. Traverse pages without refreshing, courtesy of Livewire’s groundbreaking wire:navigate feature!

wire navigation feature in laravel livewire v3


💡 Get ready to take your development to the next level with Laravel Livewire V3! 💡

And there’s even more to discover! 🌟 Stay ahead of the curve with Livewire’s cutting-edge features and elevate your projects to new heights.