The Laravel community is buzzing with excitement as Taylor Otwell, the brain behind this PHP framework, reveals a sneak peek of Laravel 11 at Laracon US 2023. This release is about to shake up web development. Let’s dive into the changes:

Middleware Directory Disappears

In Laravel 11, the familiar middleware directory in App\Http is gone when you install it. But don’t worry, creating a middleware is still a piece of cake. Just use the artisan command, and it will set everything up for your middleware.

Goodbye HTTP Kernel

Laravel 11 waves goodbye to the Kernel.php file in App\Http, shifting the responsibility for defining new middleware to the app.php file in the bootstrap folder. It’s a significant change signaling Laravel’s adaptability.

// To register custom Middleware
<?php
use Illuminate\Foundation\Application;
use Illuminate\Foundation\Configuration\Exceptions;
use Illuminate\Foundation\Configuration\Middleware;
use App\Http\Middleware\CustomMiddleware;

return Application::configure()
            ->withProviders()
            ->withRouting(
                web: __DIR__ . '/../routes/web.php',
            //  api: __DIR__ . '/../routes/apiphp',
                commands: __DIR__ . '/../routes/console.php'
              )
            ->withMiddleware( function( Middleware $middleware ) {
              //
              $middleware->web( append: CustomMiddleware::class );
            })
            ->withExceptions( function( Exceptions $exceptions ){
              //
            })->create();  

Config Files Revamp

The ‘config’ directory gets a makeover in Laravel 11. It now starts empty, with configuration variables finding a new home in the .env file, streamlining configuration management and enhancing security.

Meet ‘config:publish’

A powerful addition to Laravel’s toolkit, ‘config:publish’ simplifies publishing configuration files. For instance, running ‘artisan config:publish database‘ generates a dedicated database configuration file. Precision and organisation at your fingertips.

// To publish all the config files
php artisan config:publish

// Specific config file
php artisan config:publish database

Route Transformation: install:api

Laravel 11 takes a leap in routes by removing the api.php file from the routes directory. To create APIs, the ‘artisan install:api’ command is your new best friend, aligning with Laravel’s commitment to simplicity.

php artisan install:api

Streamlined Broadcasting: install:broadcasting

For apps using broadcast routes or Laravel Echo, Laravel 11 streamlines the process by removing ‘channels.php’ and introducing the ‘artisan install:broadcasting’ command. Real-time communication is easy.

php artisan install:broadcasting

Farewell to the Console Kernel

With the removal of the HTTP Kernel, the Console Kernel also bids adieu. Scheduled commands find a new home in the ‘console.php’ file, emphasising Laravel’s adaptability.

Schedule::command('reminder')->hourly()

Zero Command Registration

In Laravel 11, there’s no need to register custom artisan commands. They are auto-registered with the Laravel application, prefixed with ‘app:’, ensuring smooth integration and usage.

php artisan make:command TestCommand

// We don't need to register this command

// To use
php artisan app:test-command

Conclusion

The Laravel community, alongside the Laravel Team, is diligently working to implement these groundbreaking changes. As we eagerly await the final release of this remarkable framework, expect more exciting innovations. Laravel is set to maintain its status as the top choice for web application development. Get ready for a new era of web development, marked by efficiency and organisation. Stay tuned for the official release, with more surprises in store.

In the dynamic landscape of software development, where innovation converges with precision, roadmap testing tasks serve as our guiding constellations. They provide a strategic roadmap that illuminates the path to successful testing, guiding us through the complex intricacies of our software projects. Picture them as our unwavering guides, ensuring we tread the right course and aligning our efforts towards a common destination.

The Crucial Role of Roadmap Testing Tasks

The essence of roadmap testing tasks lies in their profound ability to provide early insights into the behaviour and performance of our software. They are the watchmen of quality assurance, their constant presence helping us steer clear of potential pitfalls during development or post-release. By intricately weaving testing activities into our roadmap, we empower our teams to proactively unearth and resolve issues, thereby diminishing the risk of major setbacks. The true beauty of roadmap testing tasks is that they grant every team member an unobstructed view of what needs to be tested and how to embark on this testing journey, fostering alignment and unity of purpose.

Crafting the Blueprint: Information Essentials for Roadmap Testing Tasks

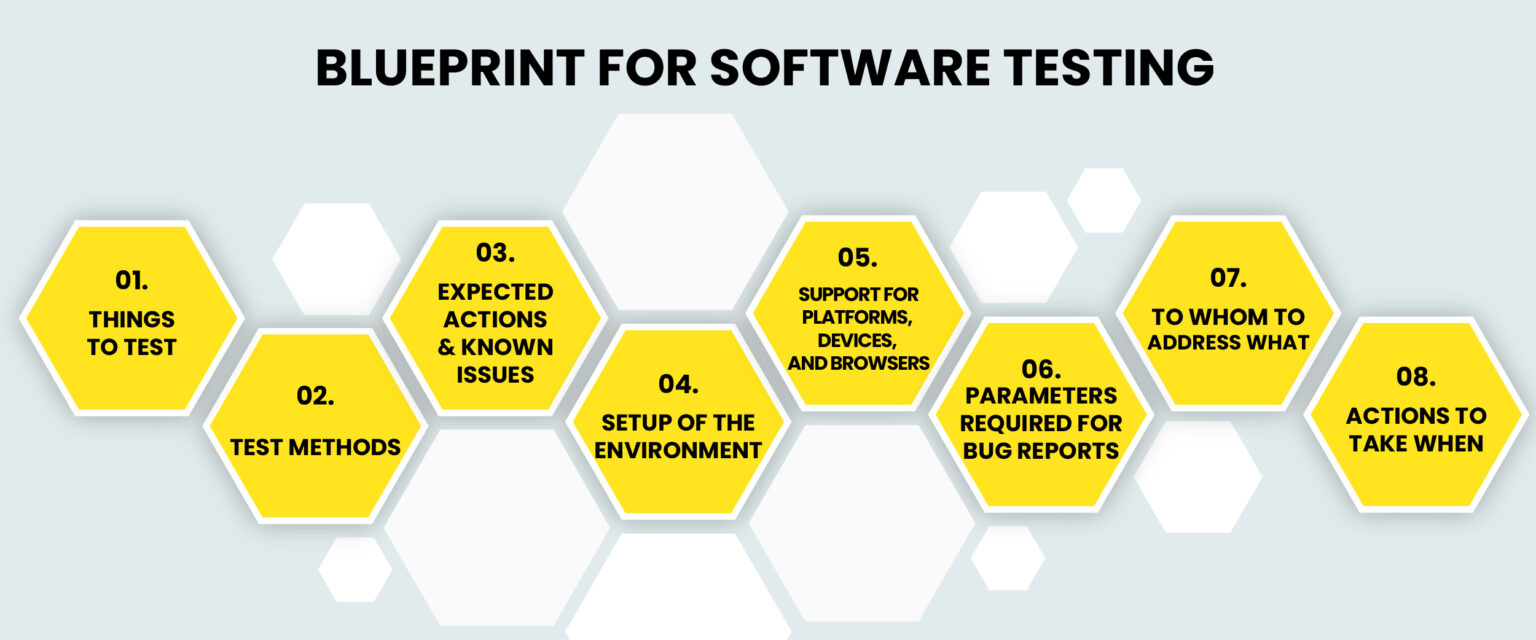
To sculpt roadmap testing tasks into invaluable instruments, certain indispensable details must be etched into their fabric:

  • Things to Test: Inscribe a comprehensive list of the software’s aspects that need to be examined. These could encompass specific features, intricate functionalities, user workflows, or integration junctures. By identifying these areas, a holistic testing strategy takes form.
  • Test Methods: Furnish a detailed blueprint for test execution. This should encompass meticulous instructions regarding test setup, the preparatory rituals for test data, and the choreography of actions or inputs necessary for each test case. This explicit guidance ensures a harmonious testing orchestration.
  • Expected Actions and Known Issues: Chart the anticipated outcomes for every test case, articulating the desired results, the system’s expected responses, and any contextual constraints. Concurrently, spotlight known issues or quirks that testers should be mindful of, thus granting them the gift of foresight during the testing voyage.
  • Setup of the Environment: Detail the prerequisites for the testing milieu. This encompasses hardware, software components, dependencies, and any intricate configurations that must be instantiated. The clarity in setup instructions ensures the crucible of testing remains consistent and unbiased.
  • Support for Platforms, Devices, and Browsers: Outline the spectrum of platforms, devices, and browsers that warrant inclusion in the testing realm. Specifying versions and configurations for scrutiny guarantees comprehensive compatibility and a seamless user experience.
  • Parameters required for Bug Reports: Define the components of a robust bug report. This may encompass the procedural steps for replicating the anomaly, a side-by-side comparison of anticipated versus actual outcomes, supplemented with visual evidence through screenshots or videos, and the inclusion of pertinent log files or error messages. These elements furnish an investigator’s toolkit for swift issue resolution.
  • To whom to address what: Provide contact information for the various stakeholders or teams participating in the testing saga. Clearly designate the appropriate channels for specific inquiries—whether they pertain to technical snags, clarifications on test cases, the need for environmental setup support, or general feedback. This framework ensures the transmission of information is seamless and expeditious.
  • Actions to Take When: Equipping testers with a manual for unexpected contingencies can be a lifesaver. Include directives for handling scenarios like unexpected errors, system hiccups, performance bottlenecks, or compatibility conundrums. This ensures testers are well-armed to confront the unpredictability of the testing terrain.

Empowering Engineering and QA Teams: The Benefits of Detailed Testing Information

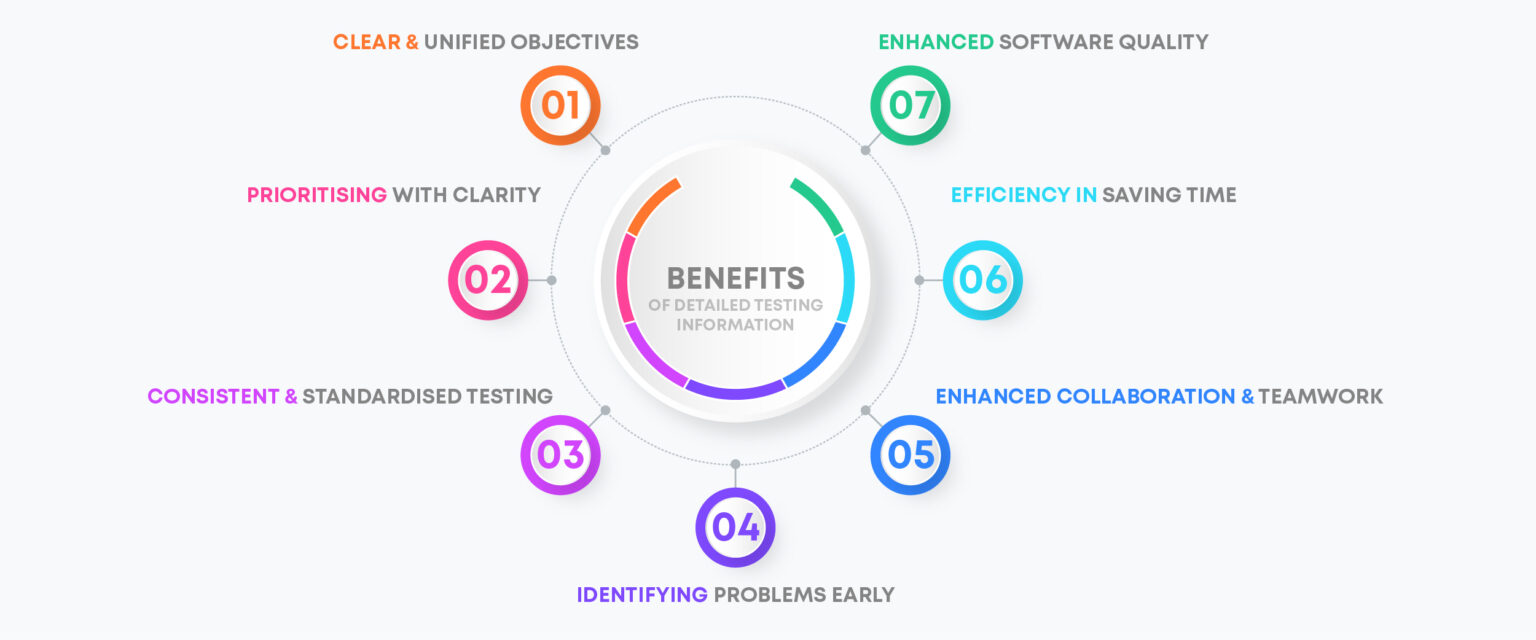
Incorporating an exhaustive repository of testing information within roadmap tasks confers numerous advantages upon our engineering and QA brigades:

  • Clear and Aligned Goals: The crystalline clarity offered by detailed testing information leaves no room for ambiguity or misinterpretation. The entire team, in unison, apprehends the mandate—eliminating contradictory narratives and paving the way for superior communication.
  • Focus and Prioritization: Armed with a compass of clarity, teams adeptly calibrate their focus, directing their energies towards the most pivotal facets. The ability to prioritise with precision ensures that resources are allocated judiciously, avoiding futile excursions into trivialities.
  • Consistent and Standardised Testing: The close link between roadmap tasks and testing protocol weaves a tapestry of uniformity. Through shared test cases and processes, the team forges a common language, enabling seamless collaboration and result comparison.
  • Catching Issues Early: When the expected outcome is meticulously outlined, deviations are glaringly conspicuous. Early detection of anomalies ushers in swift mitigation, sparing precious time and mitigating the risk of complications in later stages.
  • Improved Communication and Teamwork: Detailed testing information catalyses harmonious inter-team communication. All stakeholders converse fluently in the language of testing objectives, methods, and anticipated outcomes—cementing bonds and amplifying collective strength.
  • Time-Saving Efficiency: Armed with a roadmap of instructions and test cases, teams tread the path of efficiency. Unencumbered by the fog of uncertainty, they move with celerity, sidestepping needless fumbling and blunders—propelling projects towards timely fruition.
  • Better Software Quality: The inclusion of exhaustive testing details within roadmap tasks is akin to a vigilant sentinel guarding against subpar quality. Thorough testing, underpinned by meticulous documentation, apprehends issues at their embryonic stage—yielding software of superior quality and contented users.

Conclusion:

In the world of software testing, think of roadmap testing tasks as your trusty guides. They light up the way and help us navigate through the maze of testing. These tasks are like the instruction manuals that tell us what to test, how to test it, and what to look out for. When we get these tasks right, we improve how we talk to each other, work more efficiently, spot problems quicker, and make better software.

At Scalybee Digital, we understand how important these roadmap testing tasks are in our software development journey. We know they’re like a compass guiding us towards doing great work. So, let’s embrace them with confidence, and together, we’ll reach new heights in our testing adventures. The journey is ahead of us, and it’s filled with the promise of excellence.

Node.js is a powerful JavaScript runtime that empowers developers to construct scalable and efficient applications. One of its standout features is its innate support for streams, a fundamental concept that significantly enhances data management, particularly when dealing with extensive data volumes and real-time processing.

In this comprehensive guide, we will delve into the world of Node.js streams, exploring their various types (Readable, Writable, Duplex, and Transform), and uncover effective strategies for harnessing their potential to streamline your Node.js applications.

Node.js Streams: An Overview

Node.js streams serve as the backbone of data management in Node.js applications, offering a potent solution for handling sequential input and output tasks. They shine in scenarios involving file manipulation, network communication, and data transmission.

The key differentiator of streams lies in their ability to process data in manageable chunks, eliminating the need to load the entire dataset into memory at once. This memory-efficient approach is pivotal when dealing with colossal datasets that may surpass memory limits.

As shown in the image above, when working with streams, data is typically read in smaller chunks or as a continuous flow. These data chunks are temporarily stored in buffers, providing space for further processing.

When working with streams, data is read in smaller, more digestible portions or as a continuous flow. These data chunks find temporary refuge in buffers, paving the way for further processing. This methodology proves invaluable in real-time applications, such as stock market data feeds, where incremental data processing ensures timely analysis and notifications without burdening system memory.

Why Use Streams?

Streams offer two compelling advantages over alternative data handling methods:

Memory Efficiency: Streams process data in smaller, more manageable chunks, eliminating the need to load large amounts of data into memory. This approach reduces memory requirements and optimizes system resource utilization.

Time Efficiency: Streams enable immediate data processing as soon as it becomes available, without waiting for the entire data payload to arrive. This leads to quicker response times and overall improved performance.

Proficiency in understanding and using streams empowers developers to optimize memory, accelerate data processing, and enhance code modularity, rendering streams a potent asset in Node.js apps. Notably, diverse Node.js stream types cater to specific needs, offering versatility in data management. To maximize the benefits of streams in your Node.js application, it’s crucial to grasp each stream type clearly. Let’s now delve into the available Node.js stream types.

Types of Node.js Streams

Node.js offers four core stream types, each designed for a particular task:

Readable Streams

Readable streams facilitate the extraction of data from sources like files or network sockets. They emit data chunks sequentially and can be accessed by adding listeners to the ‘data’ event. Readable streams can exist in either a flowing or paused state, depending on how data consumption is managed.

const fs = require('fs'); 
// Create a Readable stream from a file 

const readStream = fs.createReadStream('the_princess_bride_input.txt', 'utf8'); 

// Readable stream 'data' event handler readStream.on('data', (chunk) => { console.log(`Received chunk: ${chunk}`); }); 

// Readable stream 'end' event handler readStream.on('end', () => { console.log('Data reading complete.'); }); 

// Readable stream 'error' event handler readStream.on('error', (err) => { console.error(`Error occurred: ${err}`); });

In this code snippet, we use the fs module’s createReadStream() method to create a Readable stream. We specify the file path ‘the_princess_bride_input.txt’ and set the encoding to ‘utf8’. This Readable stream reads data from the file in small chunks.

We then attach event handlers to the Readable stream: ‘data’ triggers when data is available, ‘end’ indicates the reading is complete, and ‘error’ handles any reading errors.

Utilising the Readable stream and monitoring these events enables efficient data retrieval from a file source, facilitating further processing of these data chunks.

Writable Streams

Writable streams are tasked with sending data to a destination, such as a file or network socket. They offer functions like write() and end() to transmit data through the stream. Writable streams shine when writing extensive data in a segmented fashion, preventing memory overload.

const fs = require('fs'); 

// Create a Writable stream to a file 
const writeStream = fs.createWriteStream('the_princess_bride_output.txt'); 

// Writable stream 'finish' event handler 
writeStream.on('finish', () => { console.log('Data writing complete.'); }); 

// Writable stream 'error' event handler 
writeStream.on('error', (err) => { console.error(`Error occurred: ${err}`); }); 

// Write a quote from "The  to the Writable stream 
writeStream.write('As '); 
writeStream.write('You '); 
writeStream.write('Wish'); 
writeStream.end();

In this code snippet, we’re using the fs module to create a Writable stream using createWriteStream(). We specify ‘the_princess_bride_output.txt’ as the destination file.

Event handlers are attached to manage the stream. The ‘finish’ event signals completion, while ‘error’ handles writing errors. We populate the stream using write() with chunks like ‘As,’ ‘You,’ and ‘Wish.’ To finish, we use end().

This Writable stream setup lets you write data efficiently to a specified location and handle post-writing tasks.

Duplex Streams

Duplex streams blend the capabilities of readable and writable streams, allowing concurrent reading from and writing to a source. These bidirectional streams offer versatility for scenarios demanding simultaneous reading and writing operations.

const { Duplex } = require("stream"); 

class MyDuplex extends Duplex { 
constructor() { 
super(); this.data = ""; 
this.index = 0; 
this.len = 0; 
} 

_read(size) { 

// Readable side: push data to the stream 
const lastIndexToRead = Math.min(this.index + size, this.len); this.push(this.data.slice(this.index, lastIndexToRead)); this.index = lastIndexToRead; 

if (size === 0) { 
// Signal the end of reading 
this.push(null); 
} 
} 

_write(chunk, encoding, next) { 

const stringVal = chunk.toString(); 
console.log(`Writing chunk: ${stringVal}`); 
this.data += stringVal; this.len += stringVal.length; next(); 
} 
} 

const duplexStream = new MyDuplex(); 

// Readable stream 'data' event handler 
duplexStream.on("data", (chunk) => { console.log(`Received data:\n${chunk}`); }); 

// Write data to the Duplex stream 
// Make sure to use a quote from "The Princess Bride" for better performance :) duplexStream.write("Hello.\n"); 
duplexStream.write("My name is Inigo Montoya.\n"); 
duplexStream.write("You killed my father.\n"); 
duplexStream.write("Prepare to die.\n"); 

// Signal writing ended 
duplexStream.end();

In the previous example, we used the Duplex class from the stream module to create a Duplex stream, which can handle both reading and writing independently.

To control these operations, we define the _read() and _write() methods for the Duplex stream. In this example, we’ve combined both for demonstration purposes, but Duplex streams can support separate read and write streams.

In the _read() method, we handle the reading side by pushing data into the stream with this.push(). When the size reaches 0, we signal the end of the reading by pushing null.

The _write() method manages the writing side, processing incoming data chunks into an internal buffer. We use next() to mark the completion of the write operation.

Event handlers on the Duplex stream’s data event manage the reading side, while the write() method writes data to the Duplex stream. Finally, end() marks the end of the writing process.

Duplex streams provide bidirectional capabilities, accommodating both reading and writing and enabling versatile data processing.

Transform Streams

Transform streams constitute a unique subset of duplex streams with the ability to modify or reshape data as it flows through the stream. These streams find frequent application in tasks involving data modification, such as compression, encryption, or parsing.

const { Transform } = require('stream'); 

// Create a Transform stream 
const uppercaseTransformStream = new Transform({ 
transform(chunk, encoding, callback) { 

// Transform the received data const transformedData = chunk.toString().toUpperCase(); 

// Push the transformed data to the stream 
this.push(transformedData); 

// Signal the completion of processing the chunk 
callback(); 
} 
}); 

// Readable stream 'data' event handler 
uppercaseTransformStream.on('data', (chunk) => { console.log(`Received transformed data: ${chunk}`); }); 

// Write a classic "Princess Bride" quote to the Transform stream uppercaseTransformStream.write('Have fun storming the castle!'); uppercaseTransformStream.end();

Transform streams empower developers to apply flexible data transformations while data traverses through them, enabling customised processing to suit specific needs.

In the provided code snippet, we utilise the Transform class from the stream module to create a Transform stream. Inside the stream’s options, we define the transform() method to handle data transformation, which in this case converts incoming data to uppercase. We push the transformed data with this.push() and signal completion using callback().

To handle the readable side of the Transform stream, we attach an event handler to its data event. Writing data is done with the write() method, and we end the process with end().

Transform streams enable flexible data transformations as data moves through them, allowing for customised processing. A solid understanding of these stream types empowers developers to choose the most suitable one for their needs.

Using Node.js Streams

To gain practical insight into the utilisation of Node.js streams, let’s embark on an example where we read data from one file, apply transformations and compression, and subsequently write it to another file using a well-orchestrated stream pipeline.

const fs = require('fs'); 
const zlib = require('zlib'); 
const { Readable, Transform } = require('stream'); 

// Readable stream - Read data from a file 
const readableStream = fs.createReadStream('classic_tale_of_true_love_and_high_adventure.txt', 'utf8'); 

// Transform stream - Modify the data if needed 
const transformStream = new Transform({ 
transform(chunk, encoding, callback) { 
// Perform any necessary transformations 
const modifiedData = chunk.toString().toUpperCase(); 
// Placeholder for transformation logic 
this.push(modifiedData); 
callback(); 
}, 
});

// Compress stream - Compress the transformed data 
const compressStream = zlib.createGzip(); 

// Writable stream - Write compressed data to a file 
const writableStream = fs.createWriteStream('compressed-tale.gz'); 

// Pipe streams together readableStream.pipe(transformStream).pipe(compressStream).pipe(writableStream); 

// Event handlers for completion and error 
writableStream.on('finish', () => { console.log('Compression complete.'); }); writableStream.on('error', (err) => { console.error('An error occurred during compression:', err); });

In this code snippet, we perform a series of stream operations on a file. We begin by reading the file using a readable stream created with fs.createReadStream(). Next, we use two transform streams: one custom transform stream (for converting data to uppercase) and one built-in zlib transform stream (for compression using Gzip). We also set up a writable stream with fs.createWriteStream() to save the compressed data to a file named ‘compressed-file.gz.’

In this example, we seamlessly connect a readable stream to a custom transform stream, then to a compression stream, and finally to a writable stream using the .pipe() method. This establishes an efficient data flow from reading the file through transformations to writing the compressed data. Event handlers are attached to the writable stream to gracefully handle finish and error events.

The choice between using .pipe() and event handling hinges on your specific requirements:

  • Simplicity: For straightforward data transfers without additional processing, .pipe() is a convenient choice.
  • Flexibility: Event handling offers granular control over data flow, ideal for custom operations or transformations.
  • Error Handling: Both methods support error handling, but events provide greater flexibility for managing errors and implementing custom error-handling strategies.

Select the approach that aligns with your use case. For uncomplicated data transfers, .pipe() is a streamlined solution, while events offer more flexibility for intricate data processing and error management.

Best Practices for Working with Node.js Streams

Effective stream management involves adhering to best practices to ensure efficiency, minimal resource consumption, and the development of robust, scalable applications. Here are some key best practices:

  • Error Management: Be vigilant in handling errors by listening to the ‘error’ event, logging issues, and gracefully terminating processes when errors occur.
  • High-Water Marks: Select appropriate high-water marks to prevent memory overflow and data flow interruptions. Consider the available memory and the nature of the data being processed.
  • Memory Optimization: Release resources such as file handles or network connections promptly to avoid unnecessary memory consumption and resource leakage.
  • Utilise Stream Utilities: Node.js offers utilities like stream.pipeline() and stream.finished() to simplify stream handling, manage errors, and reduce boilerplate code.
  • Flow Control: Implement effective flow control mechanisms, such as pause(), resume(), or employ third-party modules like ‘pump’ or ‘through2,’ to manage backpressure efficiently.

By adhering to these best practices, you can ensure efficient stream processing, minimal resource usage, and the development of robust, scalable Node.js applications.

Conclusion

In conclusion, Node.js streams emerge as a formidable feature, facilitating the efficient management of data flow in a non-blocking manner. Streams empower developers to handle substantial data sets, process real-time data, and execute operations with optimal memory usage. A deep understanding of the various stream types, including Readable, Writable, Duplex, and Transform, coupled with best practice adherence, guarantees efficient stream handling, effective error mitigation, and resource optimization. Harnessing the capabilities of Node.js streams empowers developers to construct high-performance, scalable applications, leveraging the full potential of this indispensable feature in the Node.js ecosystem.

In today’s world of modern applications, the demand for non-blocking or asynchronous programming has become paramount. The need to execute multiple tasks in parallel, all while ensuring that heavy operations don’t hinder the user interface (UI) thread, has led to the emergence of coroutines as a solution in modern programming languages. In particular, Kotlin has embraced coroutines as an alternative to traditional threads, offering a more streamlined approach to asynchronous execution.

Coroutine Features:

1. Lightweight and Memory-Efficient:

One of the standout features of coroutines is their lightweight nature. Unlike traditional threads, which can be resource-intensive due to the creation of separate stacks for each thread, coroutines make use of suspension. This suspension allows multiple coroutines to operate on a single thread without blocking it, thereby conserving memory and enabling concurrent operations without the overhead of thread creation.

2. Built-in Cancellation Support:

Coroutines come with a built-in mechanism for automatic cancellation. This feature ensures that when a coroutine hierarchy is in progress, any necessary cancellations can be triggered seamlessly. This not only simplifies the code but also mitigates potential memory leaks by managing the cancellation process more efficiently.

3. Structured Concurrency:

Coroutines embrace structured concurrency, which means they execute operations within a predefined scope. This approach not only enhances code organization but also helps in avoiding memory leaks by tying the lifecycle of coroutines to the scope in which they are launched.

4. Jetpack Integration: 

Coroutines seamlessly integrate with Jetpack libraries, providing extensive support for Android development. Many Jetpack libraries offer extensions that facilitate coroutine usage. Some even provide specialized coroutine scopes, making structured concurrency an integral part of modern Android app development.

5. Callback Elimination

When fetching data from one thread and passing it to another, traditional threading introduces tons of callbacks. These callbacks can significantly reduce the code’s readability and maintainability. Coroutines, on the other hand, eliminate the need for callbacks, resulting in cleaner and more comprehensible code.

6. Cost-Efficiency

Creating and managing threads can be an expensive operation due to the need for separate thread stacks. In contrast, creating coroutines is remarkably inexpensive, especially considering the performance gains they offer. Coroutines don’t have their own stacks, making them highly efficient in terms of resource utilization.

7. Suspendable vs. Blocking

Threads are inherently blocking, meaning that when a thread is paused (e.g., during a sleep operation), the entire thread is blocked, preventing it from executing any other tasks. Coroutines, however, are suspendable. This means that when a coroutine is delayed, it can yield control to other coroutines, allowing them to execute concurrently. This ability to suspend and resume tasks seamlessly enhances the overall responsiveness of an application.

8. Enhanced Concurrency

Coroutines provide a superior level of concurrency compared to traditional threads. Multiple threads often involve blocking and context switching, which can be slow and resource-intensive. In contrast, coroutines offer more efficient context switching, making them highly suitable for concurrent tasks. They can change context at any time, thanks to their suspendable nature, leading to improved performance.

9. Speed and Efficiency

Coroutines are not only lightweight but also incredibly fast. Threads are managed by the operating system, which introduces some overhead. In contrast, coroutines are managed by developers, allowing for fine-tuned control. Having thousands of coroutines working in harmony can outperform a smaller number of threads, demonstrating their speed and efficiency.

10. Understanding Coroutine Context

In Kotlin, every coroutine operates within a context represented by an instance of the CoroutineContext interface. This context defines the execution environment for the coroutine, including the thread it runs on. Here are some common coroutine contexts:

  • Dispatchers.Default: Suitable for CPU-intensive work, such as sorting a large list.
  • Dispatchers.Main: Used for the UI thread in Android applications, with specific configurations based on runtime dependencies.
  • Dispatchers.Unconfined: Allows coroutines to run without confinement to any specific thread.
  • Dispatchers.IO: Ideal for heavy I/O operations, such as long-running database queries.

Example:

CoroutineScope(Dispatchers.Main).launch {
  task1()
}
CoroutineScope(Dispatchers.Main).launch {
 task2()
}

Import following dependencies to build.gradle (app) level file

implementation "org.jetbrains.kotlinx:kotlinx-coroutines-core:x.x.x"
implementation "org.jetbrains.kotlinx:kotlinx-coroutines-android:x.x.x"
implementation "androidx.lifecycle:lifecycle-viewmodel-ktx:x.x.x"
implementation "androidx.lifecycle:lifecycle-runtime-ktx:x.x.x"

Types of Coroutine Scopes

In Kotlin coroutines, scopes define the boundaries within which coroutines are executed. These scopes help determine the lifecycle of coroutines and provide a structured way to manage them. Coroutin is always call suspend method or other coroutine method.

There are three primary coroutine scopes:

1. Global Scope

Coroutines launched within the global scope exist for the duration of the application’s lifecycle. Once a coroutine completes its task, it is terminated. However, if a coroutine has unfinished work and the application is terminated, the coroutine will also be abruptly terminated. Let’s imagine a situation when the coroutines have some work or instruction left to do, and suddenly we end the application, then the coroutines will also die, as the maximum lifetime of the coroutine is equal to the lifetime of the application.

Example:

import ...

class MainActivity : AppCompatActivity() {
    val TAG = "Main Activity"
    override fun onCreate(savedInstanceState: Bundle?) {
        super.onCreate(savedInstanceState)
        setContentView(R.layout.activity_main)
        GlobalScope.launch {
            Log.d(TAG, Thread.currentThread().name.toString())
        }
        Log.d("Outside Global Scope",  Thread.currentThread().name.toString())
    }
}

2. Lifecycle Scope

The lifecycle scope is similar to the global scope, but with one crucial difference: coroutines launched within this scope are tied to the lifecycle of the activity. When the activity is destroyed, any coroutines associated with it are also terminated. This ensures that coroutines do not continue running unnecessarily after the activity’s demise.

Example:

import ...

const val TAG = "Main Activity"
class MainActivity : AppCompatActivity() {
    override fun onCreate(savedInstanceState: Bundle?) {
        super.onCreate(savedInstanceState)
        setContentView(R.layout.activity_main)
 
           // launching the coroutine in the lifecycle scope
            lifecycleScope.launch {
                while (true) {
                    delay(1000L)
                    Log.d(TAG, "Still Running..")
                }
            }
 
            GlobalScope.launch {
                delay(5000L)
                val intent = Intent(this@MainActivity, SecondActivity::class.java)
                startActivity(intent)
                finish()
            }
    }
}

3. ViewModel Scope

The ViewMondel scope is akin to the lifecycle scope, but with a more extended lifespan. Coroutines lauched within this scope persist as long as the associated ViewModel is active. A ViewModel is a class that manages and stores UI-related data, making it a suitable scope for coroutines performing tasks tied to the ViewModel’s lifecycle.

Example:

import ...

class MyViewModel : ViewModel() {
  
    /**
     * Heavy operation that cannot be done in the Main Thread
     */
    fun launchDataLoad() {
        viewModelScope.launch {
            sortList()
            // Modify UI
        }
    }
  
    suspend fun sortList() = withContext(Dispatchers.Default) {
        // Heavy work
    }
}

Coroutines Functions

In Kotlin, two main functions are used to start coroutines:

  1. launch{ }
  2. async { }  

Using launch

The launch function is ideal when you need to perform an asynchronous task without blocking the main thread. It does not wait for the coroutine to complete and can be thought of as “fire and forget.”

Example:

private fun printSocialFollowers(){
        CoroutineScope(Dispatchers.IO).launch {
            var fb = getFBFollowers()
            var insta = getInstaFollowers()
            Log.i("Social count","FB - $fb, Insta - $insta")
        }
    }

    private suspend fun getFBFollowers(): Int{
        delay(1000)
        return 54
    }

    private suspend fun getInstaFollowers(): Int{
        delay(1000)
        return 113
    }

In the above example, getInstaFollowers() will wait for getFBFollowers() to finish executing, and after that, getFBFollowers() and getInstaFollowers() will be executed concurrently.

Using async

On the other hand, the async function is used when you require the result or output from your coroutine and are willing to wait for it. However, it’s important to note that async can block the main thread at the entry point of the await() function, so it should be used judiciously.

Here’s an example demonstrating the use of async:

private fun printSocialFollowers(){
        CoroutineScope(Dispatchers.IO).launch {
            var fb = async { getFBFollowers() }
            var insta = async { getInstaFollowers() }
            Log.i("Social count","FB - ${fb.await()}, Insta - ${insta.await()}")
        }
    }

    private suspend fun getFBFollowers(): Int{
        delay(1000)
        return 54
    }

    private suspend fun getInstaFollowers(): Int{
        delay(1000)
        return 113
    }

In the above example, both getFBFollowers() and getInstaFollowers() are called in parallel, reducing execution time compared to the launch function. However, it’s important to keep in mind that async should be used when you need the results and are prepared for potential blocking.

Conclusion

In conclusion, coroutines are a powerful tool for writing asynchronous code in a more readable and maintainable manner. By understanding the key concepts, how coroutines work, and how to use them effectively in practice, you can take advantage of the benefits they offer in modern programming. Whether you are a beginner or an experienced developer, this guide will provide you with the knowledge and resources to master coroutines and improve your programming skills.

STRATEGY

  • Design thinking
  • Product Roadmap

DESIGN

  • User Experience
  • User Interface
  • Illustrations & Icons

FRONT END
DEVELOPEMENT

  • HTML
  • CSS
  • Posene

Brief

Growth Mindset Institute (GMI) sought a software solution to revolutionize their employee assessment process. They needed a dynamic survey creation and report generation system that could provide valuable insights and recommendations for individual and corporate clients. The system had to support various response types, generate customized reports, process secure payments, and cater to a diverse user base in multiple languages.

The new software solution streamlined client management, increased GMI’s earnings by 50%, and enhanced their employee assessment process. The integration of secure payment gateways and multi-language support expanded their market presence, fostering growth mindsets and remarkable success.

Technology
PHP, Laravel, API (Passport), Livewire, Alpine JS, Tailwind CSS

Client's Requirement

Growth Mindset Institute (GMI) sought a software solution to revolutionize their employee assessment process. They needed a dynamic survey creation and report generation system that could provide valuable insights and recommendations for individual and corporate clients. The system had to support various response types, generate customized reports, process secure payments, and cater to a diverse user base in multiple languages.

SOLUTION

We developed a comprehensive software solution for GMI to address their business requirements. The system was built using PHP and Laravel, with additional technologies including API (Passport) for secure authentication, Livewire for dynamic user interfaces, and Alpine JS and Tailwind CSS for enhanced front-end functionalities.

RESULT

The implementation of our software solution resulted in significant improvements for GMI. Client management was streamlined, and their earnings increased by 50%. The dynamic survey creation and report generation capabilities enhanced the employee assessment process, providing valuable insights and recommendations for individual and corporate clients. The integration of secure payment gateways ensured seamless transactions, while the multi-language support expanded GMI’s reach and market presence.

With our tailored software solution, GMI has transformed their employee assessment process, fostered growth mindsets, and achieved remarkable success. Contact us today to see how we can help your organization thrive.

STRATEGY

  • Design thinking
  • Product Roadmap

DESIGN

  • User Experience
  • User Interface
  • Illustrations & Icons

FRONT END
DEVELOPEMENT

  • HTML
  • CSS
  • Posene

Brief

COTIQU Pty Ltd, a service industry leader, sought an innovative solution to streamline their requirement gathering process and connect clients with vendors seamlessly. The dynamic ORB (Online Requirement Building) application system, built with cutting-edge technologies, transformed the process. SuperAdmin now effortlessly manages dynamic requirement documents, while automated vendor matching ensures efficient connections. Secure payment integration through PayPal simplifies transactions, enhancing user satisfaction. With an intuitive user interface, clients experience a seamless journey from registration to communication. The ORB system brought remarkable improvements, automating manual processes, optimizing efficiency, and revolutionizing COTIQU’s operations.

Technology
Laravel, VueJS, MySql, LiveWire

Client's Requirement

COTIQU Pty Ltd, a leader in the service industry, recognized the need for an innovative solution to streamline their requirement gathering process and facilitate seamless vendor-client connections. They aimed to automate manual processes, improve efficiency, and enhance the user experience.

SOLUTION

To meet these requirements, the ORB (Online Requirement Building) application system was developed. Built using cutting-edge technologies such as Laravel, VueJS, MySql, and LiveWire, this dynamic platform revolutionized the way COTIQU collected requirements and connected clients with vendors.

RESULT

The implementation of the ORB application system brought remarkable improvements to COTIQU’s operations. The automated requirement gathering process, dynamic document creation, and efficient vendor-client connections resulted in enhanced efficiency and customer satisfaction. Clients experienced a seamless journey, while vendors benefited from streamlined connections and improved communication.


Contact us today to discuss how the ORB application system can benefit your business and take it to new heights.

STRATEGY

  • Design thinking
  • Product Roadmap

DESIGN

  • User Experience
  • User Interface
  • Illustrations & Icons

FRONT END
DEVELOPEMENT

  • HTML
  • CSS
  • Posene

Brief

Latitude Property, had the objective of creating an impressive real estate marketing website that would effectively showcase properties and generate leads. They sought to provide potential buyers and tenants with a user-friendly platform for browsing properties and access comprehensive property detail pages. The client aimed to capture leads through the website and required advanced search functionality to help users find properties that matched their preferences. Additionally, they wanted to integrate a map feature to offer a visual representation of property locations and enhance the overall user experience. The ultimate goal was to build a powerful marketing tool to drive success in the real estate industry.

Technology
WordPress

Client's Requirement

The goal of Latitude Property was to create a highly effective real estate marketing website that showcases properties and generates leads. The website needed to provide a user-friendly platform for property browsing, offer comprehensive property detail pages, facilitate lead generation, and include advanced search functionality.

SOLUTION

To meet the business requirement, we developed a WordPress website using the powerful combination of the Houzez theme and Elementor page builder. Our solution provided the following key features:

  • Property Listings: The website included a dedicated section for property listings, allowing users to browse through a wide range of properties available for sale or rent.
  • Property Detail Pages: Each property listed on the website had its own dedicated detail page, providing comprehensive information about the property, including features, specifications, high-quality images, and contact details.
  • Lead Generation for Properties: To capture potential buyers or tenants, we incorporated lead generation forms throughout the website. This enabled interested users to express their interest in a specific property, allowing real estate agents or property owners to follow up and nurture leads effectively.
  • Advanced Property Searching: Our intuitive search functionality allowed users to filter properties based on specific criteria such as location, price range, property type, and more. This ensured that users could easily find properties that matched their preferences and requirements.
  • Property Location on Map: To provide a visual representation of property locations, we integrated a map feature into the website. This allowed users to view properties on a map, understand their geographical context, and make more informed decisions.

RESULT

The Latitude Property real estate marketing website stands as a testament to the successful synergy of business goals and technological innovation within the real estate industry. By offering an intuitive property browsing platform, comprehensive property detail pages, lead generation mechanisms, advanced search capabilities, and a visual map representation, we ensured that every facet of user engagement was optimized. 

This innovative solution not only effectively showcased properties and their unique attributes but also streamlined lead generation, fostering efficient follow-up and conversion. The website’s user-friendly interface and robust functionalities underscored its role as a potent marketing tool, providing potential buyers and tenants with comprehensive information, visual context, and seamless search experiences.

In collaboration with Latitude Property, we have fortified their position in the real estate landscape by creating a digital cornerstone that bridges aspiration and acquisition.

STRATEGY

  • Design thinking
  • Product Roadmap

DESIGN

  • User Experience
  • User Interface
  • Illustrations & Icons

FRONT END
DEVELOPEMENT

  • HTML
  • CSS
  • Posene

Brief

In the world of online gaming, players demand an authentic and captivating board game experience. “Brandi Dog” fulfils these requirements, offering seamless integration, scalability, and performance. Developed with a powerful tech stack, including Vercel, Laravel Vapor, MongoDB, and Next JS, the game ensures optimal performance and a smooth user interface. With authentic gameplay, players immerse themselves in the beloved Swiss board game. The server-less architecture allows for scalability and lag-free gaming, even with high user volumes. The multiplayer feature enables players to challenge friends and connect with others worldwide, fostering a sense of community. The user-friendly interface guarantees an enjoyable and engaging gaming experience for all.

Technology
VERCEL, Laravel VAPOR,
MONGODB, NEXT JS

Client's Requirement

  • Background:

    • Evolving landscape of online gaming.
    • Growing demand for captivating and authentic online board game experiences.
  • Player Expectations:

    • Players seek an immersive and genuine online board game encounter.
    • Desire for seamless integration of cutting-edge technologies.
    • Emphasis on scalability and high-performance gameplay.
    • User-friendly interface as a pivotal factor.
  • Multiplayer Engagement:

    • Preference for multiplayer environment among players.
    • Desire to challenge friends and interact with a global player community.
  • Opportunity Identification:

    • Introduction of “Brandi Dog” as the ultimate online board game solution.
    • Alignment of “Brandi Dog” with business requirements and player preferences.

SOLUTION

  •  To deliver an unparalleled gaming experience, “Brandi Dog” has been meticulously developed using a powerful combination of cutting-edge technologies. Our tech stack, including:


    • Hosting Platform: Vercel
    • Backend Framework: Laravel Vapor
    • Database Management: MongoDB
    • Frontend Framework: Next JS
    • ensures optimal performance, scalability, and seamless integration.

RESULT

The “Brandi Dog” case study is a reflection of ScalyBee Services’ unwavering commitment to shaping unforgettable gaming experiences. With each milestone reached, we reaffirm our dedication to pioneering innovation, setting benchmarks, and leading the way in transforming the gaming landscape for players worldwide.

Imagine yourself as an ice-cream vendor. You have a foundational ice-cream recipe, but to captivate your customers even more, you infuse various flavors into that base ice cream, resulting in an enticing range of newly flavored products. This concept, akin to enhancing ice cream with flavors, correlates with the notion of “Product Flavors” in the realm of Android app development. These flavors allow developers to create distinct versions of an app, each tailored to different scenarios, audiences, or requirements. Let’s delve into the intricacies of Product Flavors and their applications in this article.

The Significance of Product Flavors

In the multifaceted landscape of app development, there are scenarios where customization and versatility are paramount. Product Flavors emerge as a pivotal tool to address such scenarios. Consider these instances:

  • White Labeling: You’re delivering a product to multiple clients, each necessitating their own branding elements like logos, colors, and styles. Product Flavors empower you to cater to individual client preferences through a single codebase.
  • Distinct Endpoints: Your app interfaces with various backend services through different API endpoints. With Product Flavors, you can seamlessly switch between endpoints, catering to the requirements of different clients or environments.
  • Free and Paid Versions: Your app has both free and paid versions, each offering specific features. Product Flavors enable you to manage the variations between these versions efficiently, ensuring a smooth user experience.

Unveiling Product Flavors

As per the official definition from developer.android.com, Product Flavors encompass different versions of a project that are designed to coexist on a single device, the Google Play store, or a repository. They facilitate the creation of app variants that share common source code and resources, while allowing differentiation in terms of features, resources, and configurations.

Configuring Product Flavors

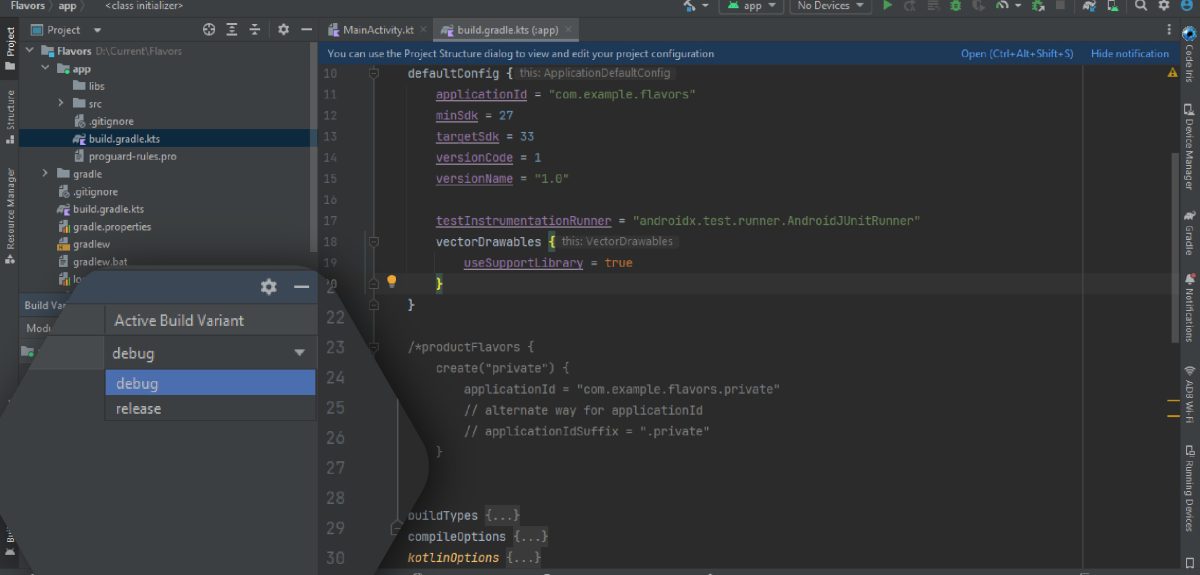
Let’s examine a scenario where you’re building an app with both ‘free’ and ‘paid’ versions. The build.gradle file plays a crucial role in configuring these variants. By employing the productFlavors block, you can define unique properties for each flavor:

android {
    namespace = "com.example.flavors"
    compileSdk = 33

    defaultConfig {
        applicationId = "com.example.flavors"
        minSdk = 27
        targetSdk = 33
        versionCode = 1
        versionName = "1.0"
    }
}

As per above config, your build-variants (build types) looks like this:

So, product flavors allow you to output different versions of your project by simply changing only the components and settings that are different between them.

This configuration allows you to maintain a single codebase while tailoring the app for different use cases. The ‘free’ and ‘paid’ flavors can possess distinct application IDs, version codes, version names, and more.

Customizing Product Flavors

Beyond the basic configurations, Product Flavors offer the flexibility to fine-tune each variant.

Now based on the above ‘free’ and ‘paid’ specifications, you will create another version of the same app. So your build.gradle file will look like this:

android {
    namespace = "com.example.flavors"
    compileSdk = 33

    defaultConfig {
        applicationId = "com.example.flavors"
        minSdk = 27
        targetSdk = 33
        versionCode = 1
        versionName = "1.0"
    }

    productFlavors {
        create("free") {
            applicationId = "com.example.flavors.free"
            // or applicationIdSuffix = ".free"
        }
        create("paid") {
            applicationId = "com.example.flavors.paid"
            // or applicationIdSuffix = ".paid"
        }
    }
}

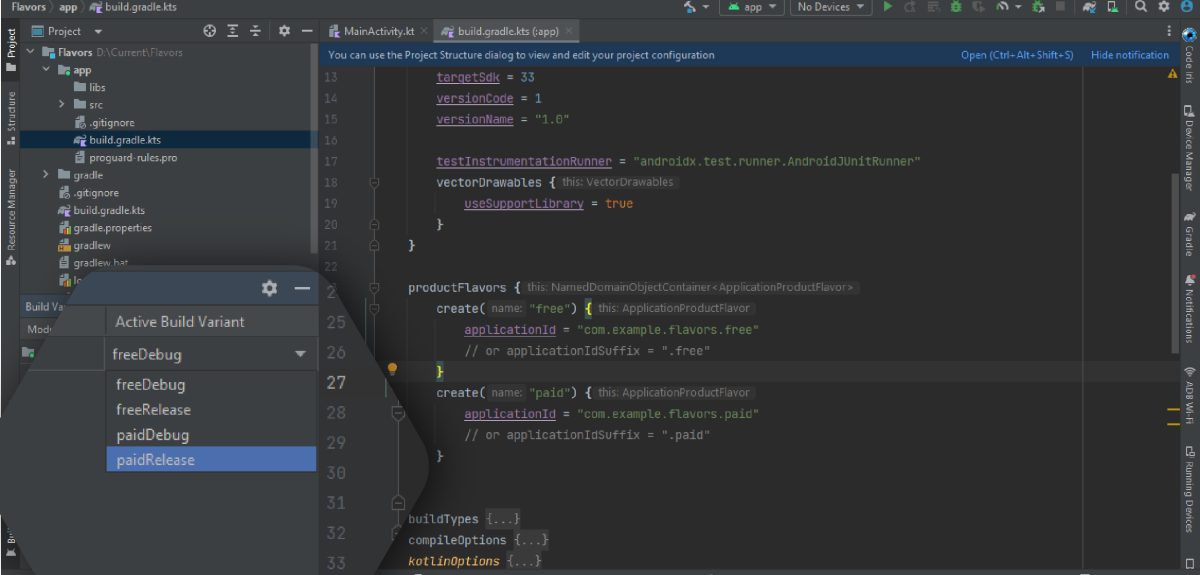
As a result, your build-variants will look like this:

You can define more properties that enable you to cater to specific client needs while maintaining code consistency such as:

create("free") {
    applicationId = "com.example.flavors.free"
    versionCode = 2
    versionName = "1.1"
    minSdk = 28
    targetSdk = 33
    buildConfigField("String", "HOST_URL", "\"www.flavors.com/free\"")
    manifestPlaceholders["enable_crashlytics"] = true
}

Diverse Build Variants

In Android app development, build variants play a pivotal role. By default, ‘debug’ and ‘release’ are the primary build types. Debug is the build type that is used when we run the application from the IDE directly onto the device. Release is the build type that is used when we create a signed APK/AAB for publishing on play-store.

However, there are scenarios where you need additional build variants, like for QA testing or client previews. These build variants, combined with Product Flavors, provide an arsenal of options to cater to diverse requirements. Whether it’s creating personalized versions for clients, managing different API endpoints, or offering distinct app versions, Product Flavors streamline the development process. This can be achieved through the buildTypes block:

buildTypes {
    // default
    getByName("release") {
        isMinifyEnabled = true
        proguardFiles(
            getDefaultProguardFile("proguard-android-optimize.txt"),
            "proguard-rules.pro"
        )
    }

    // default
    getByName("debug") {
        isMinifyEnabled = false
        isDebuggable = true
        applicationIdSuffix = ".debug"
        android.buildFeatures.buildConfig = true
        buildConfigField("String", "HOST_URL", "\"www.dev-flavors.com\"")
    }

    // created staging build-type
    create("staging") {      
        initWith(getByName("debug"))
        applicationIdSuffix = ".debugStaging"
        buildConfigField("String", "HOST_URL", "\"www.staging-flavors.com\"")
    }


    // created qa build-type
    create("qa") {
        applicationIdSuffix = ".qa"
        buildConfigField("String", "HOST_URL", "\"www.qa-flavors.com\"")
    }
}

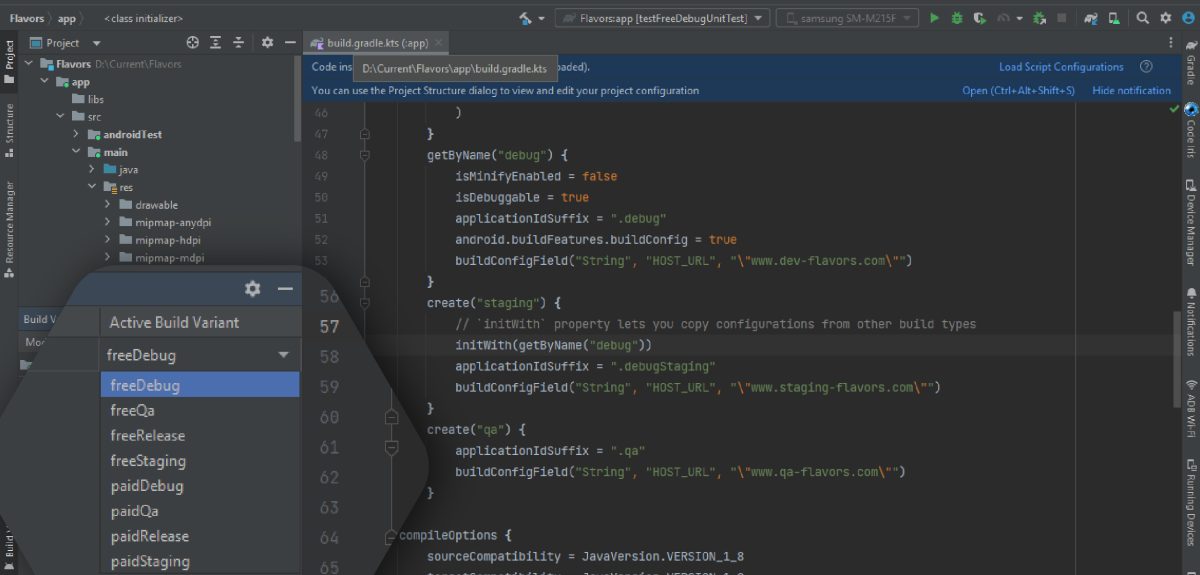
Now your build-variants look like this:

This is how you can create different versions of your app for different purposes, using a single code-base and different configuration.

Selenium is one of the most prominent test frameworks used to automate user actions on the product under test. With its capability to revolutionise web testing by providing a robust automation framework, Selenium has become an indispensable tool for software testing professionals. However, like any technological marvel, Selenium test automation isn’t without its own set of challenges. In this comprehensive blog post, we’ll delve into the intricacies of Selenium test automation, exploring some common challenges that testers encounter and, more importantly, providing insightful solutions to overcome these hurdles.

1. Dynamic Web Elements

Challenge: The modern landscape of web applications is dominated by dynamic elements. These elements have an inherent nature of altering their attributes or positions post page loads or interactions, which often results in failures during element identification.

Solution: Combatting this challenge requires employing a variety of strategies to handle dynamic elements effectively:

Utilise Unique Attributes: It’s prudent to identify elements using attributes that are less susceptible to change. Employing these attributes ensures a more stable test environment.

WebElement element = driver.findElement(By.id("dynamic-element-id"));

Leverage CSS Selectors: CSS selectors emerge as a powerful option, providing flexibility in targeting elements based on attributes, classes, or positions.

WebElement element = driver.findElement(By.cssSelector(".dynamic-class"));

2. Cross-Browser Compatibility

Challenge: The dynamic nature of web applications necessitates seamless functionality across different browsers and versions. Ensuring this cross-browser compatibility can be a tedious and time-consuming task.

Solution: Overcoming cross-browser compatibility challenges can be achieved by following these steps:

Browser-Specific WebDriver: Selenium offers browser-specific drivers, enabling testers to ensure compatibility with various browsers.

import org.openqa.selenium.WebDriver;
import org.openqa.selenium.chrome.ChromeDriver;
import org.openqa.selenium.firefox.FirefoxDriver;
import org.openqa.selenium.edge.EdgeDriver;

WebDriver driver = new ChromeDriver(); 

3. Flakiness of Tests

Challenge: The vexing problem of test flakiness can be highly frustrating. Tests that pass sometimes and fail other times can be difficult to debug and impact the reliability of the testing process.

Solution: To combat test flakiness, adopt the following strategies:

Explicit Waits: Using explicit waits instead of  implicit waits ensures that elements load before interactions occur.

import org.openqa.selenium.By;
import org.openqa.selenium.WebDriver;
import org.openqa.selenium.WebElement;
import org.openqa.selenium.support.ui.ExpectedConditions;
import org.openqa.selenium.support.ui.WebDriverWait;

WebDriverWait wait = new WebDriverWait(driver, 10);
WebElement element = wait.until(ExpectedConditions.presenceOfElementLocated(By.id("element-id")));

Reduced Reliance on Sleep Statements: Avoid Thread.sleep() to eliminate unnecessary delays. Employ more adaptive waits responsive to element visibility.

4. Handling Pop-ups and Alerts

Challenge: The intrusion of pop-ups, alerts, and dialogs in automation scripts can disrupt the script’s flow, leading to challenges in maintaining test reliability.

Solution: Tackling pop-ups and alerts can be achieved through the following steps:

Leveraging the Alert API: WebDriver provides an Alert API to manage JavaScript alerts, prompts, and confirmations.

import org.openqa.selenium.Alert;

// ...

Alert alert = driver.switchTo().alert();
alert.accept();  // or alert.dismiss(), alert.sendKeys(), etc.

5. Data-Driven Testing

Challenge: The complexity of implementing and managing tests with varied data inputs poses a significant hurdle in the testing process.

Solution: To simplify data-driven testing, consider the following strategies:

Utilise External Data Sources: Store test data in external files such as CSV, Excel, or JSON, and dynamically read them within your tests.

import java.io.BufferedReader;
import java.io.FileReader;
import java.io.IOException;
// ...
try (BufferedReader br = new BufferedReader(new FileReader("test_data.csv"))) {
    String line;
    while ((line = br.readLine()) != null) {
        // Parse and use data for testing
    }
} catch (IOException e) {
    e.printStackTrace();
}

Parameterized Testing: Utilise testing frameworks like TestNG to parameterize test methods and execute them with diverse data sets.

6. Test Maintenance

Challenge: As web applications evolve, automation tests can become obsolete, necessitating frequent updates to ensure their continued effectiveness.

Solution: Effective management of test maintenance requires adopting the following practices:

Embrace Page Object Model (POM): Implement a structured approach through POM to segregate page elements and interactions from test logic.

public class LoginPage {
    private WebDriver driver;
    private WebElement usernameInput;
    private WebElement passwordInput;
    private WebElement loginButton;

    public LoginPage(WebDriver driver) {
        this.driver = driver;
        // Initialize elements
    }
    public void login(String username, String password) {
        usernameInput.sendKeys(username);
        passwordInput.sendKeys(password);
        loginButton.click();
    }
}

Regular Review and Updates: As the application evolves, ensure timely updates to align tests with the current application state.

7. Limited Reporting

Challenge: Reporting plays a pivotal role in the testing phase, bridging the gap between testers and developers. Selenium, however, lacks robust reporting capabilities.

Solution: To address this limitation, harness programming language-based frameworks that offer enhanced code designs and reporting. Frameworks such as TestNG and Gauge provide insightful reports to aid in the testing process.

Conclusion

Selenium test automation brings an array of benefits, but navigating its challenges requires a strategic mindset and a commitment to learning. Dynamic elements, cross-browser compatibility, test flakiness, pop-ups handling, data-driven testing, and test maintenance are just a subset of the challenges Selenium enthusiasts encounter. By applying patience, continuous learning, and a proactive problem-solving approach, you can craft a suite of automation tests that elevate the quality and efficiency of your web development projects.

Each challenge serves as an opportunity for growth, pushing you to experiment, innovate, and refine your Selenium testing skills. Embrace these challenges, explore the solutions provided, and cultivate a mastery that positions you as a skilled test automation engineer in the ever-evolving world of software testing.

In the dynamic landscape of Selenium test automation, challenges are not roadblocks; they are stepping stones to innovation. With Scalybee Digital‘s advanced solutions, conquer these challenges and elevate your testing prowess to new heights.